Pages

Monday, November 30, 2015

My First Blog Interview

Hello everyone! I hope you all had a wonderful Thanksgiving holiday! Cori and I enjoyed a quiet turkey day together then had a bigger family gathering on Sunday.

Excited news for you today. As some of you may know, Jessica of Chronically Vintage has been conducting interviews with vintage bloggers from around the globe. Her "Meet a fellow vintage blogger" interview series has been a lot of fun to follow. And today I am her featured blogger!! I'm very excited and had a lot of fun answering her questions. I've been following Jessica since I started blogging and really feel I have found a kindred vintage loving spirit.

Hop on over to Chronically Vintage to read her post! I am offering a special Etsy discount code too!


If anyone would like to collaborate for future blog posts please let me know! I would love to work with anyone interested in vintage, sewing, history, travel or museums as much as I am! Are you interested in guest blogging, sponsored posts, giveaways, link swapping, pattern swapping or other collaboration ideas? Excellent! Let's chat! You can contact me at vintagevisions27(at)gmail(dot)com

Tuesday, November 17, 2015

Green Silk Sacques

I was searching online recently and found some images of a lovely 18th century gown and thought "Hey, that looks familiar!" It's making me have second thoughts about remodeling my own green silk sacque.
But only a little. :)


 Robe a la Francaise 1725, European, Made of silk - Source


Saturday, November 14, 2015

Two Lace Ladies

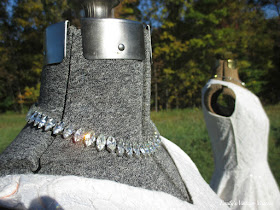
I've wanted to photograph these two dresses together for a while now. I finally had the chance this fall and thankfully the weather cooperated. The dresses look much better outside against our stunning fall backdrop then they would have looked inside. Sadly all that beautiful color is gone now that we are well in to November. The gown with the long train is of course my wedding dress and the other is the one I made to wear to the reception.


This is actually the first time I've pulled these dresses out since packing them away after the wedding. Please forgive the wrinkled fabric as I didn't take the time to steam them.


You can read all about the construction of these dresses here. But I thought this was a good time to share some more detailed shots too. :) (There are loads of wedding photos in this post. If you're interested in how I planned my vintage themed wedding check out this post.)


Normally you want your bias tape to match your project. I used peach bias tape to bind the neck, arms and hem of my wedding gown because that's what I had on hand at the time. Plus I really didn't care that it didn't match, I just wanted the dress done!


My felt flowers are still looking nice! The corsages were costume made by Lucy of 1940s Style for You. Lucy also runs an Etsy shop of the same name. I made all our bouquets using wool felt, floral wire and an array of vintage mother of pearl, plastic and rhinestone buttons. I know I took photos while I was making them but can't seem to find the flash drive that hold them. Pooh! But when I do I'll post a tutorial for sure!


At some point I plan to do some major deconstruction and refitting of my reception dress. I had to resize the pattern which created some fitting issues with the bodice. It was thrown together pretty quickly the week before the wedding and never fit right. I don't like looking at the picture of me wearing it because I can see how wonky it is. Anyone else have projects like that? It would make a great outfit for a fancy News Year's Eve party so it's totally worth spending some time to fix it if I can.


I plan to do the following to my reception dress:

- Detach the skirt and bodice
- Rework the bodice to remove the excess fabric/bulk from neck and bust area. I added way to much ease when I resized the pattern. This should help the neck lay a little smoother. It's also tight under the arms so I need to do something about that.
- Shorten the skirt 2 to 3 inches
- Replace the zipper with one that is less bulky.

And a few last shots of me with my creations. And a peak at how I look on a non vintage day, which I'll be honest is most days during the week. I'm really a jeans and t-shirt (or sweater if it's chilly!) kind of girl, but that's because my work day starts so early and I'm lazy in the mornings!

There, now you're totally sick of seeing wedding dress photos! :)


Friday, November 6, 2015

An Old Project - 1770s Stays

Today I'd like to share another project, long over due. This post has been sitting in my draft fold since I started blogging. Oh my! I do hope you pardon the crummy photos, I took them with my cell phone. They are not great but at least they serve as some kind of documentation of the construction of my stays.

Stays are a crucial foundation garment to any 18th century wardrobe. They give you support and that great period correct shape. In my first few years of reenacting I didn't wear stays. I didn't think I needed them nor did I have the money or knowledge to purchase or make a pair of my own. I soon learned otherwise. 
My first pair of stays were made using the JP Ryan pattern. I have used a couple different JP Ryan patterns and for the most part found them easy to use. You get a fairly accurate looking historical garment even though you are using modern sewing techniques. I felt this was a fairly good pattern with easy to follow instructions. The pattern pieces fit together well and I found I didn't need to make many adjustments.
JP Ryan stays pattern

I used a cotton canvas for the lining and a linen cotton blend for the outer fabric. A good friend of mine makes baskets so getting basket caning to use for boning was easy. The basket caning was a little wider than I wanted so I had to trim each piece to the right width. For the binding I used thin off-white leather. It was a little on the heavy side but not too bad to work with. I set out to make my first pair of stays all by hand ... but after I finished stitching the boning channels on the front two panels I gave up and used the sewing machine. 

They turned out well, are fairly accurate in appearance, and have held up well after several years of use. But after some more research, I was determined my next pair of stays would be as accurate as possible! This meant using more authentic materials and completely hand sewing them! A daunting task for sure but I felt I was up to the challenge.
Stays, 1770-1780 V&A
I mentioned this was an older project, yes? Well, these stay were started at a Hive workshop in 2011! The workshop began with some background information – who wore stays, what were made of, and how they changed throughout the 18th century.  Hallie Larkin, who not only makes stays as part of her sewing business, also collects originals and had a few examples at the workshop. This is part of the reason I love collecting vintage and antique clothing of my own. As enjoyable as it is to examine original items in museums, online, or in books, nothing beats seeing these things up close and personal! After a brief discussion of what kind of stays each of us wanted to make, it was time for our fittings. For my new pair of stays I choose to make a more “fashionable” set from the 1770s.  

I should mention that one of the original pairs of stays on hand were from the 1770s; a lovely, but faded, pink pair with blue binding and stiffened with baleen. Not only that but one of the reproduction pairs available to try on were an exact copy of these. I’m not sure which was more exciting, trying on the reproduction pair of stays with the originals right there beside me or knowing that I’m the same size as a woman who lived 200 years ago. :)

Materials Used
Linen interface
Checked linen lining
Blue worsted wool
Basket reeds for boning and metal stay for bust support
Cardstock stiffener
Leather binding
Linen thread
1/4" linen tape

All of the materials were provided as part of the workshop with the exception of the blue worsted wool which I purchased from Burnley and Trowbridge. For anyone interested in making their own set of 18th century stays, Smith and Larkin at The Sign of the Golden Scissors offers a variety stays kits and supplies.


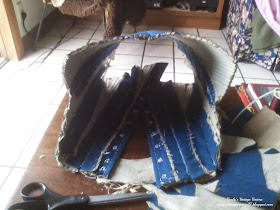
Please pardon the crummy quality of these next photos. Unlike the JP Ryan pattern, each section of the stays was assembled individually. The wool fashion fabric is placed on top of the heavy linen interfacing, the boning channels are marked and then stitched. I used Tiger Tape to help me keep the channels nice and straight. After all the pieces - 2 fronts, 2 sides, 2 side backs, and 2 backs - were completed it was time to start attaching them together. It's difficult to see in these pictures but each section is whipped together leaving a generous seam allowance should they ever need to be altered later on. Something the JP Ryan pattern does not do.


These really hold their shape!! You can see the seam allowance is just tacked in place.


Here you can see the almost completed stays. At this point, before adding the binding and lining, I was able to try them on for fit. You may notice that the eyelets are off set, (something seen on originals) this so they line up straight when you spiral lace your stays. This particular style of stays are cut a little lower in the front and back compared to my first pair. The "points" of the front sections sit just above the bust line. Most high fashion gowns of the 1770s and 1780s were cut lower in front so these stays accommodates that fashion.


And the inside without the lining.


This photo, from an older post, shows the white linen tape covering the seams and the white leather binding. At some point I will take some better photos of these stays. I also want to do some comparison photos wearing these and my JP Ryan stays. These fit SOOOO much better and are super comfortable to wear for long periods of time.