Before you even think about refilling your vintage compact, you need to clean it. If there is any old makeup present, it can harbor dust, bacteria, and potential irritants. Yuck!! Use hot soapy water. Q-tips and small tooth brushes can be helpful to thoroughly clean the inside of your vintage compact. To sanitize your compact soak a cotton ball with rubbing alcohol and wipe the inside. Then rinse with warm water and set aside to dry.
Take care with certain vintage compacts as the mirrors can come loose and will need to be re-glued. Also some compacts have rhinestones or other special details or finished that should not be submerged in water. If that's the case you might want to consider refilling a different compact. However, if you are careful these can still be cleaned, refilled and enjoyed.
So, here is what you are going to need:
- Rubbing alcohol
- Loose powder or pressed powder in your choice of color
- Freshly cleaned vintage compact - Scrap of cheesecloth or linen fabric (optional)
- Small bowl to mix powder
- Butter knife or piece of stiff paper/card stock
- Small spoon
In a small, clean bowl, spoon in some loose powder or you can use a butter knife to scrape out your pressed powder from a modern compact.
Using a small spoon, slowly mix a little rubbing alcohol (about a cap full) with the powder until you form a creamy paste. Don't add too much liquid to start or you will end up with a soupy mess! It's better to add a tiny amount first and add more as needed. Be sure to smooth out any lumps as you mix.
Scoop the paste into vintage compact pan and gently press into place with the back of your spoon. Smooth out any irregularities with your knife or stiff paper/card stock. Be sure not to overfill your compact. Use a cotton ball or q-tip to clean up the edges of your compact.
This next step is optional but makes a nice finish to your powder. Take a scrap cheesecloth or linen fabric and gently press over the compact. Remove. The cloth will create a nice surface look and help smooth powder.
Keep the compact open and allow to dry overnight. Before attempting to use your newly filled vintage compact, make sure the surface is dry by wiping a finger across it. When the compact is ready to use it should feel 'powdery' and smooth.
That's it!

Showing posts with label Tutorial. Show all posts
Showing posts with label Tutorial. Show all posts
Friday, July 31, 2020
Friday, December 8, 2017
Holiday Decor - Vintage Tree Bling
Tired of using the the same Christmas ornaments year after year?
Looking for something different and unique for your holiday decor? How
about tree ornaments made from vintage jewelry! This is something I've
wanted to do for a while and this year I finally did it! I used my
collection of sparkly vintage odds and ends to decorate a table top
tree. You can do the same!


Here is what you will need. It's handy to keep a list of the items you hang on the tree, specially if you are using small items like earrings. That way you wont loose anything.


Have fun with this and don't be afraid to mix in some
modern pieces as well. My little tree looks so pretty at night. Sadly
my camera doesn't take very good pictures in low light but it's so
sparkly! :)
Stay tuned for another post this week about vintage holiday decor! I can't wait to share with everyone how I decorated my fireplace mantel.

Here is what you will need. It's handy to keep a list of the items you hang on the tree, specially if you are using small items like earrings. That way you wont loose anything.
- Christmas tree (I should note that I use a small fake tree for this so there was no fear of pine pitch. No vintage was harmed!)
- Christmas Lights
- Scissors
- Ribbon
- Assortment of vintage jewelry and sparkly bits
Most
of the items shown here came in one large box lot from and antique shop
several years ago. Many of the pieces I've picked up over the years are
missing stones or are damaged in some way so I got a really good deal
on them. But that's OK because you don't notice the flaws once they are
on the tree. :) Keep your eyes open at yard sales, flea markets, etc.
and you will find some good deals. One thing I sometimes see at antique
shops are mason jars full of beaded
necklaces and other odds and ends of mis-matched jewelry. That would be
perfect for a project like this. I've found some nice non-vintage
pieces at thrift stores too like the cat pin seen in this post. My favorite victory pin (the large V with rhinestones) is even hanging on the tree!
Here is what you do.

 I've been collecting 1950s/60s rhinestone necklaces for a long time and these
look especially pretty draped across the branches. I find them
everywhere and have to stop myself from buying them all lol! Prices vary but on average I never pay more then $10 or $12 for a
necklace. Often they are less then that. Occasionally I will splurge on a nicer piece like the one I wore for
my wedding. Or blue and white one seen below that came with matching
earrings.
I've been collecting 1950s/60s rhinestone necklaces for a long time and these
look especially pretty draped across the branches. I find them
everywhere and have to stop myself from buying them all lol! Prices vary but on average I never pay more then $10 or $12 for a
necklace. Often they are less then that. Occasionally I will splurge on a nicer piece like the one I wore for
my wedding. Or blue and white one seen below that came with matching
earrings.
Dress clips, shoe clips, and earrings can be clipped
to the branches. Tip! With a fake tree you can bend the ends of the
branches so these little pieces sit just right.
Here is what you do.
- After selecting your vintage pin, cut a piece of ribbon 5-6 inches in length (longer if desired)
- Thread the ribbon through the back of the pin. Even out the ends of the ribbon and tie a knot leaving a small tail.
- Use your scissors to curl the ends of your ribbon OR tie the ends in a pretty little bow
- Place your ornament on your tree and you're done!
I've been collecting 1950s/60s rhinestone necklaces for a long time and these
look especially pretty draped across the branches. I find them
everywhere and have to stop myself from buying them all lol! Prices vary but on average I never pay more then $10 or $12 for a
necklace. Often they are less then that. Occasionally I will splurge on a nicer piece like the one I wore for
my wedding. Or blue and white one seen below that came with matching
earrings.  |
| The rhinestone necklaces like those at the upper right are commonly found at antique shops. The necklace and bracelet at the bottom right I wore for my wedding. |
 |
| Vintage Dress Clip Tree Ornaments |
 |
| Vintage earrings make lovely ornaments too! The pink pair are from the Etsy shop of Chronically Vintage. Thank you Jessica! |
Stay tuned for another post this week about vintage holiday decor! I can't wait to share with everyone how I decorated my fireplace mantel.
Tuesday, January 31, 2017
1940s Rita Hayworth Inspired Hair Tutorial
I made a rambling video thing! Some of you may have seen it already, but if not be sure to check out my YouTube channel for my latest video. (scroll down to view) This is my first ever hair video so please be kind. It turned out much longer than I had planned but I hope some of you will find it helpful.
The hairstyle in my video is inspired by Rita Hayworth and has become my go to style when I want a vintage look for everyday. I use a very basic pin curl set, I don't follow any real pattern. Though I do section off the front portion of my hair to make couple pin curls, normally 2 or 3, that are then brushed and pinned to one side. All my curls are rolled in the same direction just because I find it quicker to do so.
For the video, I set my hair using Garnier Fructis curl shaping spray gel for natural hair hair. I let the pin curls dry over night. My hair was slightly damp and I sprayed the gel onto each section of hair as I went. As noted in the video I will sometimes use LottaBody settle lotion, which for humid weather, I find has a stronger hold.
Here is what the hairstyle looks like when using LottaBody. I should note that I had been outside for several hours before this photo was taken. :)
I would love to hear your thoughts on this video as well as any suggestions for future videos.
 |
| Rita Hayworth - Source |
For the video, I set my hair using Garnier Fructis curl shaping spray gel for natural hair hair. I let the pin curls dry over night. My hair was slightly damp and I sprayed the gel onto each section of hair as I went. As noted in the video I will sometimes use LottaBody settle lotion, which for humid weather, I find has a stronger hold.
Here is what the hairstyle looks like when using LottaBody. I should note that I had been outside for several hours before this photo was taken. :)
 |
| Photo by Jim Gallagher |
Tuesday, November 29, 2016
How to Make a 1930s Bed Jacket
Now that the colder weather is upon us, I find myself changing over the wardrobe to warmer clothing. Out come the sweaters and wool pants! We held off turning the furnace on for as long as possible but finally caved near the end of October. The "heating season" in New England is rather long and as a true Yankee I typically willing to add an extra layer if it means saving a little on the heating bill. :)
In the spirit of Giving Tuesday I thought I would share a free pattern that I came across awhile back. Originally posted on Sewing Vintage, this is a pattern for making a lovely little 1930s bed jacket.
If you use the pattern I would love to see how it turns out! Enjoy!

In the spirit of Giving Tuesday I thought I would share a free pattern that I came across awhile back. Originally posted on Sewing Vintage, this is a pattern for making a lovely little 1930s bed jacket.
If you use the pattern I would love to see how it turns out! Enjoy!
Friday, April 8, 2016
Great Hair Fridays - 1930s How To From Blogger Vintage Gal
Hello Ladies! I recently came across this wonder 'how to' on styling 1930s hair and knew I had to share it with all of you.
The UK blog, Vintage Gal, was a new one for me. This lovely lady, Cate, has some amazing style! While my own hair is far too long to achieve this style I still find it very inspirational. I hope you find Cate's hair post as enjoyable as I did.
The UK blog, Vintage Gal, was a new one for me. This lovely lady, Cate, has some amazing style! While my own hair is far too long to achieve this style I still find it very inspirational. I hope you find Cate's hair post as enjoyable as I did.
 |
| From the blogger Vintage Gal |
 |
| From the blogger Vintage Gal |
Wednesday, March 23, 2016
How to Refresh Vintage Hats/Veils
Hello everyone! Today I want to share a quick and easy way to refresh vintage hats, or fascinators, that have been badly stored and are in need to new life. Be sure to look through all the photos and to check out the accompanying video at the end of this post. (Don't forget to subscribe to my YouTube channel.)
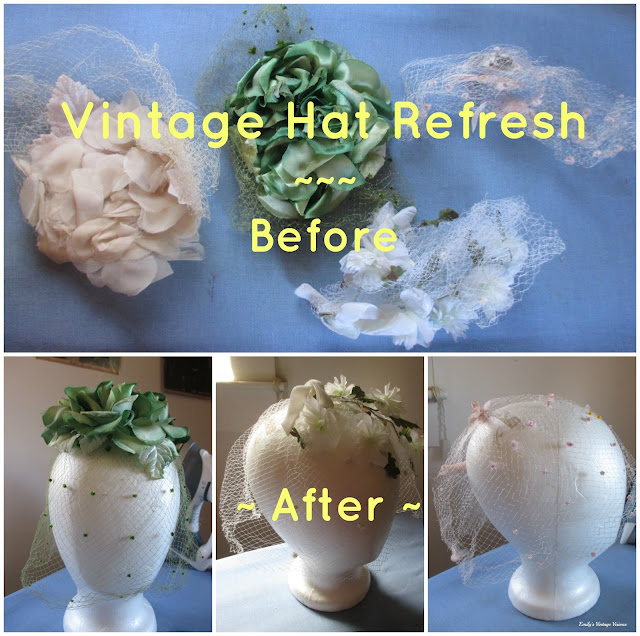
Lately I have been going through my vintage sewing and clothing items in an effort to de-stash. While sorting hats these pieces surfaced and I knew I finally needed to do something with them. I've had these vintage hats/facinators in my collection for several years now. They came to me along with some much nicer hats and had been badly stored by the former owner. I've never had much interest in late 1950s or 1960s fashions and because of their poor condition I really didn't know what to do with them. They were too pretty to toss so these sad little things have sat in a hat box unloved for the last couple of years. Until now!
Here are a few pictures of the hats before and after steaming. As you can see they were badly crushed and rather sad looking. These hats are all made from netting and have chiffon flowers and velvet leaves attached to the top, or in the case of the pink one, little velvet ribbons. So cute!


So, what will you need for this hat refresh tutorial?

A few things to keep in mind as you work. STEAM IS HOT!!! I know that seems obvious, but please be careful! DO NOT touch or press your hot iron directly on the netting or flowers of your hat. The heat could melt or otherwise damage your item. Hold your iron several inches ABOVE the hat and LET THE STEAM DO THE WORK. :)
I practiced this method on the pink net facinator first as a test as it was the most damaged of the hats. I wasn't worried about ruining it. Your iron should be set on a middle to high steam setting. Let your iron heat up while your are placing the hat on your form.
For this tutorial I used a hat form but you can also use a tailor's ham. Start by placing your hat over the form of your choice. Using your fingers, GENTLY pull/stretch the lace/letting. Do not pull too hard because you could cause the material to break.
TIP - To keep your hat from sliding around while you work place a couple straight to help hold it to your form.

Next, hold your iron several inches ABOVE your hat. Gently move the iron back and forth for a few seconds at a time to help the steam work its way into the flower petals and over the lace/letting. Let the steam to the work to relax the material and help fluff up the flower petals. It make take a few minutes so be patient.


If needed, use your fingers to lift up the flower petals then steam again. (DO NOT try and hold the petals with your fingers while steaming or you will get burned!!) Fluff, then steam. Save your fingers! :)
The flowers of the beige hat you see me working on in the video were really flat when I started. I found that several seconds of steam then using my fingers to lift up the petals followed by more steam worked well.

You may also find it helpful to tip your hat form as you work so the steam can really get under the flowers and around the netting.


That's it! What do you think? If you use this tutorial please let me know how it worked for you!

My apologies, the video is a little fuzzy at times. I think it's due to the lighting in my sewing room. I should note too, the video cut stops a little abruptly at the end because my camera decided to shut off. Silly thing. :p

Lately I have been going through my vintage sewing and clothing items in an effort to de-stash. While sorting hats these pieces surfaced and I knew I finally needed to do something with them. I've had these vintage hats/facinators in my collection for several years now. They came to me along with some much nicer hats and had been badly stored by the former owner. I've never had much interest in late 1950s or 1960s fashions and because of their poor condition I really didn't know what to do with them. They were too pretty to toss so these sad little things have sat in a hat box unloved for the last couple of years. Until now!
Here are a few pictures of the hats before and after steaming. As you can see they were badly crushed and rather sad looking. These hats are all made from netting and have chiffon flowers and velvet leaves attached to the top, or in the case of the pink one, little velvet ribbons. So cute!


So, what will you need for this hat refresh tutorial?
Supplies
- Vintage hat/veil
- Hat form or tailor's ham
- Iron with LOTS of steam OR a hand held steamer if you have one
- Straight pins (optional)
- Straight pins (optional)

A few things to keep in mind as you work. STEAM IS HOT!!! I know that seems obvious, but please be careful! DO NOT touch or press your hot iron directly on the netting or flowers of your hat. The heat could melt or otherwise damage your item. Hold your iron several inches ABOVE the hat and LET THE STEAM DO THE WORK. :)
I practiced this method on the pink net facinator first as a test as it was the most damaged of the hats. I wasn't worried about ruining it. Your iron should be set on a middle to high steam setting. Let your iron heat up while your are placing the hat on your form.
 |
| If you don't have a hat form or hat block, a tailor's ham with work just fine |
TIP - To keep your hat from sliding around while you work place a couple straight to help hold it to your form.

Next, hold your iron several inches ABOVE your hat. Gently move the iron back and forth for a few seconds at a time to help the steam work its way into the flower petals and over the lace/letting. Let the steam to the work to relax the material and help fluff up the flower petals. It make take a few minutes so be patient.


If needed, use your fingers to lift up the flower petals then steam again. (DO NOT try and hold the petals with your fingers while steaming or you will get burned!!) Fluff, then steam. Save your fingers! :)
The flowers of the beige hat you see me working on in the video were really flat when I started. I found that several seconds of steam then using my fingers to lift up the petals followed by more steam worked well.

You may also find it helpful to tip your hat form as you work so the steam can really get under the flowers and around the netting.


That's it! What do you think? If you use this tutorial please let me know how it worked for you!

My apologies, the video is a little fuzzy at times. I think it's due to the lighting in my sewing room. I should note too, the video cut stops a little abruptly at the end because my camera decided to shut off. Silly thing. :p
Friday, October 30, 2015
From the Victory Garden - Tomato Sauce
Making your own tomato sauce is super simple. We had so many tomatoes in our little victory garden this year that I thought I would give it a try. If you don't have a garden of your own, check out your local farmer's market!
What you will need:
- Tomatoes
- Sharp knife
- Pot with cover
- Measuring cup and/or a large bowl
- Metal sieve/strainer (the kind with crank handle and mesh bottom)
- Freezer bags
- FoodSaver (optional)

Take your fresh tomatoes and rinse them well to remove any dirt. Next cut away any bad spots. Dice your tomatoes into small chunks and add them to your pot. You can add a little bit of water but if your tomatoes are nice and fresh you should have enough liquid from them.


Simmer covered for 20 to 30 minutes stirring occasional. You may choose to add a dash of salt and pepper at this point. I also added some fresh basil from my garden. Because this sauce was going to be frozen for future use I didn't add very much in the way of seasoning. You can always add more spices etc. later on.


Once the tomatoes are cooked you are ready to put them through your strainer. I placed my sieve over a glass measuring cup to make things a little easier. I added about a cup of stewed tomatoes at a time. Turn the handle in one direction several times and then back the other way to scrap the bottom. Then turn again. Discard any seeds and skins.


I then poured 1 1/2 to 2 cups of the tomato sauce into my freezer bags. Dividing your sauce into smaller portions makes it easy to defrost only what you need at a time. We make a lot of home-made pizza so one bag with 1 1/2 to 2 cups of sauce is the perfect amount!
The FoodSaver is great because it vacuum seals these bags. Regular freezer bags works great too and can be purchased just about anywhere. Be sure to label your bags. And that's it!

Wednesday, December 17, 2014
Vintage Holiday Decor - Vintage Tree Bling
Tired of using the the same Christmas ornaments year after year? Looking for something different and unique for your holiday decor? How about tree ornaments made from vintage jewelry! This is something I've wanted to do for a while and this year I finally did it! I used my collection of sparkly vintage odds and ends to decorate a table top tree. You can do the same!
Here is what you will need. It's handy to keep a list of the items you hang on the tree, specially if you are using small items like earrings. That way you wont loose anything.
Have fun with this and don't be afraid to mix in some modern pieces as well. My little tree looks so pretty at night. Sadly my camera doesn't take very good pictures in low light but it's so sparkly! :)
Stay tuned for another post this week about vintage holiday decor! I can't wait to share with everyone how I decorated my fireplace mantel.
Here is what you will need. It's handy to keep a list of the items you hang on the tree, specially if you are using small items like earrings. That way you wont loose anything.
- Christmas tree (I should note that I use a small fake tree for this so there was no fear of pine pitch. No vintage was harmed!)
- Christmas Lights
- Scissors
- Ribbon
- Assortment of vintage jewelry and sparkly bits
Most of the items shown here came in one large box lot from and antique shop several years ago. Many of the pieces I've picked up over the years are missing stones or are damaged in some way so I got a really good deal on them. But that's OK because you don't notice the flaws once they are on the tree. :) Keep your eyes open at yard sales, flea markets, etc. and you will find some good deals. One thing I sometimes see at antique shops are mason jars full of beaded
necklaces and other odds and ends of mis-matched jewelry. That would be
perfect for a project like this. I've found some nice non-vintage pieces at thrift stores too like the cat pin seen in this post. My favorite victory pin (the large V with rhinestones) is even hanging on the tree!
Here is what you do.
I've been collecting 1950s/60s rhinestone necklaces for a long time and these
look especially pretty draped across the branches. I find them
everywhere and have to stop myself from buying them all lol! Prices vary but on average I never pay more then $10 or $12 for a
necklace. Often they are less then that. Occasionally I will splurge on a nicer piece like the one I wore for
my wedding. Or blue and white one seen below that came with matching
earrings.
Dress clips, shoe clips, and earrings can be clipped to the branches. Tip! With a fake tree you can bend the ends of the branches so these little pieces sit just right.
Here is what you do.
- After selecting your vintage pin, cut a piece of ribbon 5-6 inches in length (longer if desired)
- Thread the ribbon through the back of the pin. Even out the ends of the ribbon and tie a knot leaving a small tail.
- Use your scissors to curl the ends of your ribbon OR tie the ends in a pretty little bow
- Place your ornament on your tree and you're done!
I've been collecting 1950s/60s rhinestone necklaces for a long time and these
look especially pretty draped across the branches. I find them
everywhere and have to stop myself from buying them all lol! Prices vary but on average I never pay more then $10 or $12 for a
necklace. Often they are less then that. Occasionally I will splurge on a nicer piece like the one I wore for
my wedding. Or blue and white one seen below that came with matching
earrings. |
| The rhinestone necklaces like those at the upper right are commonly found at antique shops. The necklace and bracelet at the bottom right I wore for my wedding. |
|
| Vintage Dress Clip Tree Ornaments |
|
| Vintage earrings make lovely ornaments too! The pink pair are from the Etsy shop of Chronically Vintage. Thank you Jessica! |
Stay tuned for another post this week about vintage holiday decor! I can't wait to share with everyone how I decorated my fireplace mantel.
Thursday, March 14, 2013
Pillbox Hats and Chiffon Veils Worn Harem Fashion
Pillbox hats and veils, what could be prettier? I came across the newspaper clipping below while doing some other research and luckily thought to save it. It's good that I did because I also found pictures that are almost a match to the hats described. Opportunity for a blog post? You bet!
Take veils, for instance. They aren't news any longer, but their infinite variety offers a lot to the imagination. With a green and purple turban, say, you might wear a veil in flesh color to match your complexion, even to the rosy tints of the cheeks, and eye shadow.
A little newer than net or lace veils are the chiffon veils worn harem fashion. Thus type of veil is tucked in the top of a pillbox, flows down the back to the shoulders and comes around the front to cross and float back again. Incidentally, it covers up the back hair entirely, whether it's up or down. Can you imagine anything lovelier than a purple hat with a fuchsia chiffon veil?
I'd like to think that Mrs. Cunningham had a hat like this in mind when she wrote her article.
Make your own pillbox hat using this tutorial from Tuppence Ha'penny. Make it into the harem fashion described above by adding your own chiffon veil.I would love to see pictures if you do!
Although this image is from 1962, it's another great example of a pink pillbox hat and veil.
 |
| 1940s Purple Turban Hat - Source |
From the Dallas Morning News, October 26, 1938
Chiffon Veils Are Now Worn Harem Fashion
This Type Tucks in At Top of Pillbox, Flows Around Front. By Alma Cunningham. There are so many distinguishing bits of femininity on the fashion horizon this season that a woman can be different and beautiful in her own way without even trying.
This Type Tucks in At Top of Pillbox, Flows Around Front. By Alma Cunningham. There are so many distinguishing bits of femininity on the fashion horizon this season that a woman can be different and beautiful in her own way without even trying.
Take veils, for instance. They aren't news any longer, but their infinite variety offers a lot to the imagination. With a green and purple turban, say, you might wear a veil in flesh color to match your complexion, even to the rosy tints of the cheeks, and eye shadow.
A little newer than net or lace veils are the chiffon veils worn harem fashion. Thus type of veil is tucked in the top of a pillbox, flows down the back to the shoulders and comes around the front to cross and float back again. Incidentally, it covers up the back hair entirely, whether it's up or down. Can you imagine anything lovelier than a purple hat with a fuchsia chiffon veil?
I'd like to think that Mrs. Cunningham had a hat like this in mind when she wrote her article.
 |
| I'd like to think Mrs. Cunningham had a hat like this in mind when she wrote her article. Image source - Ebay |
 |
| Not really a pill box hat but it certainly is striking! - Can't remember the source, most likely http://myvintagevogue.com/ |
Although this image is from 1962, it's another great example of a pink pillbox hat and veil.
 |
| Cover Girl 1962, Maggie Eckhart - Photo by Richard Avedon Source -http://myvintagevogue.com/ |
Subscribe to:
Posts (Atom)
