Showing posts with label 18th century. Show all posts

Sunday, May 20, 2018

1770s Fashionable Gown - In Progress, Part 1

As I mentioned briefly in my last post, I have jumped head first back into historical sewing. The fabric, pattern and bodice mock up had been sitting in the stash for over a year now. So when my friend planned a sewing weekend with some of our reenacting friends early this spring, I figured it was a good excuse to pull out the project and get back to work.

I'm using the 1770s Fashionable Gown pattern from Sign of the Golden Scissors. This pattern is fantastic and has needed only very slight alterations to make it fit. While some may raise an eyebrow at the price of this pattern, keep in mind you are getting A LOT for your money. All Smith and Larkin historical sewing patterns are essentially one of their two day sewing workshops in an envelope. It's not just the paper pattern for the gown and bum roll, but historically accurate sewing instructions, notes on fitting, fabric choices, stitches, etc. as well as historical information on the particular garment you are going to recreate. Included is a colorful documentation card that you can carry with you if you choose. The instruction booklet for the 1770s gown is 35 pages with color photographs to help you with each step When making an item of historical clothing, it's important to make a mock up. Especially if you have never used the pattern before. I've made a few 18th century gowns before so I'm pretty familiar with the steps involved. However, the fit of this particular gown is very different from my other gowns. First off, it's important to note that this style of gown is high fashion for the mid 1770s. The neckline and placement of the shoulder straps reflect that, as well as the looping of the gown skirts. This gown would not be appropriate for my normal middling class or British camp follower impressions. I'm not making this for any particular event, but rather more of a "just because I can" kind of project. And yes, it's going to be entirely hand sewn for the same reason.

Fabric choice is super important, I went with a lovely striped silk taffeta that is similar to what I've seen in period portraits and original gowns.


I used some miscellaneous fabric in my stash for the mock up. There are two sizes in each envelope so I cut the 34 bust as it seemed closest to my size when wearing my stays. The only adjustments I found were needed were to shorten the shoulder straps a bit and to lower the arm holes just a touch. After that I moved on to cutting out my lining and silk bodice.

During my friend's sewing weekend I completed my bum roll, assembled the linen lining, minus sleeves and shoulder straps, and cut out all the pieces for the silk bodice. I even finished sewing the pleats into the gown back pieces.


The side seams of both the linen lining and the silk are constructed with lapped seams. The sleeves use the same period technique but require an extra step to whip the lining into place. For those that have the new American Duchess kind to 18th century sewing the lapped seam in shown on pages, __.

Here is what the sleeves look like prior to stitching. I posted a live video on my Facebook page talking about this if you would like more details.


I spent one evening cutting out the panels for my gown skirts. Originally, I thought would skip the step of cutting my silk into period correct widths and save a little sewing time. The gown skirts are made up of two front panels, two sides, and one center back panel.

As it turned out, given the actual width of my silk and not wanting to waste any, it was actually easier to follow the instructions and cut multiple widths and then tapper the lower edge of each panel as needed. (Because bum roll!!) The instructions called for each panel to be 23 inches wide, as that matched the width of the original gown the pattern was based on. My silk was 50 inches wide so my panels are actually 25 inches wide. I will be able to incorporate the selvedge edge of the fabric into the gown fronts which will be nice. And of course I had kitty "help" because no sewing project would be complete without it!

With help from my husband, I tired the linen lining on to test the fit again. Then had him help me pin the silk on top, again to test the fit. Something just seemed wonky with the fit but was excited to see the gown taking shape. I suspected the fit issues had to do with the waist placement so I consulted the fitting section of the American Duchess 18th Century Dressmaking Guide. Turns out I was correct so I will need to bring the lower edge of the waist up just a bit before adding the skirts to get rid of the bodice wrinkles. Once I attach the skirts the weight of the silk will help smooth things out as well.

So, my next steps with this gown will be to pleat the skirts (SOOOOOOOO MUCH PLEATS!) Make my adjustments to the bodice and reattach the linen shoulder straps so the skirts can be attached. Then assemble the bodice lining and fashion fabric. Once that's done I can set the sleeves (again with help from the husband) and add the silk shoulder straps. The only thing left from there will be hemming and trimming! 

FITTING NOTES!!
  • This pattern was created as a one for one copy of an original in a private collection. The bodice fronts were pieced on the original gown so a pattern piece is included for the "bodice front extension." Instructions for the gown trim are also based off the original.
  • This gown is designed to wear over period correct undergarments i.e. shift, 1770s/80s stays, bum roll and, if you wear one, an under petticoat. Pick you pattern size based on your measurements while wearing proper undergarments.
  • This style also requires a bum roll to help give the gown it's "fashionable" shape. The pattern and instructions for the bum roll are included.
  • The shoulders may feel very restricting at first. I found when I first tried the mock up on that I had to rotate the whole bodice further back then I thought. Then the neckline, which is lower and wider than my 1750s/60s gowns, sat where it needed to which should be just above the top of the stays. 
  • The arm holes are meant to be high and snug and the sleeves should fit closely as well. You will want to make sure your shift is a mid to late 18th century style with close fitting sleeves to eliminate bulk.
  • The lower back section of the bodice is not meant to sit flat against the back, it needs to have some "space" if you will, to fit over the bum roll.

Wednesday, April 27, 2016

18th Century Feathered Hats

Here is a little research project I've been working on lately. Although I don't get to attend 18th century events as much as I would like to, the time period is never from from my mind. I like keep up to date as best I can on what's happening in the reenacting world, the trending research, new sources etc. There is always something new to learn.

Lately I've been looking at 18th century hats, in particular those covered with feathers. Why I'm drawn to these I'm not entirely sure. Whether something like these would be appropriate for my typical living history portrayal remains to be seen and more research is certainly needed. My guess is that for a British camp follower in the years covering the 1750s to 1770s a fine feathered hat would be very unlikely. As an up middle class resident of say, Boston, they are a possibility. But as I said more research is needed. I have been researching in the historic newspapers without much luck as of yet. However, in the world of historic costuming and fancy dress events, pretty much anything goes. :)

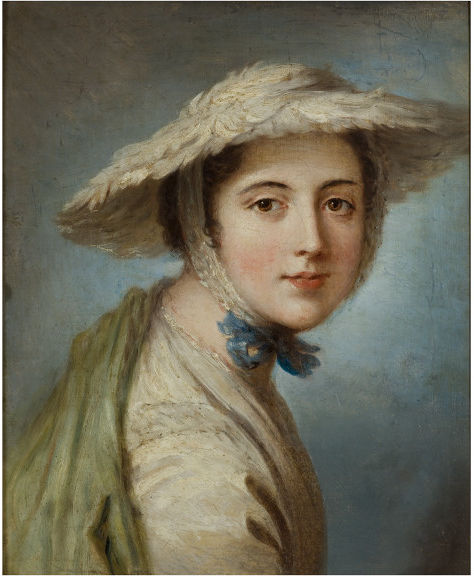
Here are a few examples of feathered hats in period art.

Oil painting, 'Head of a Girl Wearing a White Hat', ca. 1760-70, by William Hoare RA (1707-1792) V&A 833-1873
It looks like this young lady is also wearing a feather covered hat. Yes?

Philip Mercier (circa 1689-1760) - Source

And here are some serving hats in museum collections. All are dated to about the same time as the artwork above, 1750-1770 and are very similar looking. They are all around the same size too, approximately 13" to 14".

A round hat with a shallow crown and wide brim decorated with cock and guineafowl feathers in natural colours and dyed blue, yellow, red and green. The feathers are stitched to a linen ground which is lined with blue taffeta. 1750-1770 (made) V&A T.90-2003
Woman's feather hat (bergère) English or French, 1750–75. Round disk-like hat with crown only slightly elevated, foundation of linen completely covered with polychrome feathers; lined with pale pink taffeta, one pale pink silk ribbon. MFA 43.1832
Here are two more images of the same hat from the MFA. I find it interesting that you can see the edge of the straw base as well as the stitching on the underside. Zoom in for a closer look.

MFA 43.1832
MFA 43.1832
Although this next hat is a little different, only the brim is covered in feathers, it gives me hope for wearing a feather covered hat for living history events. The description says it was made in France but it's place of use was Boston.

MFA, accession number 49.916
Making a similar hat I believe would be very doable, though time consuming. I have a plain straw hat with a very low crown that could be used as a base and colored feather can be purchased at several places like Joanns. I also have left over silk taffeta to line the underside of the hat. Would I glue the feathers or stitch them in place? I'm not sure yet, likely I'll stitch them, but if I do attempt a crazy project like this you can be sure to read about it here. :)

If anyone knows of other examples, in art or surviving originals, I would love to see them.

Tuesday, April 19, 2016

A Fashionable Gown

I first posted about this silk project over the winter. Sorry no construction pictures yet. I pulled the pattern out the other night to begin reading through the directions. I also took some time to dig through by scrap fabrics to see what I had that would work for a mock up.

Fashionable Gown pattern from Larkin and Smith

I definitely want to make sure the bodice and sleeves are going to fit before a cut into my linen and silk for this 1770s fashionable gown. As noted in my earlier post, I plan to take my time with this gown. I don't have a specific event in mind for it so there is no need to rush.


On a side note, if you enjoy drooling over beautiful fabrics, especially silks (who doesn't!!) check out the fine selection over at At the Sign of the Golden Scissors. They currently have some nice linens and wools in stock too.

Striped yellow silk from At the Sign of the Golden Scissors
Pink Brocade Silk from At the Sign of the Golden Scissors

Saturday, January 23, 2016

Two Silky Winter Projects

I has silk!!! Mawhahahaha! One of my New Year's resolutions last year was to sew one thing that's truly amazing. Of course this meant breaking resolutions 1 and 2, not buying new fabric and sewing practical things. But last fall proved a surprisingly successful month for Etsy sales so I decided to treat myself.

I've been itching to make a new 18th century silk gown for a while now and really wanted to try the new "fashionable" gown pattern by Smith and Larkin. Searching for an ideal striped silk was a challenge and I had almost given up until I found this amazing silk from Duchess Trading on Etsy. It's perfect!! A touch more pink then it looked online but still very nice. And because I was a returning costumer I was able to get a small discount, always a plus! I even picked up a few silk ribbons! If you are searching for vintage ribbons, flowers, lace etc. for your next project I highly recommend Duchess Trading. Shipping is fast and the owner is fantastic to work with! :)


I've made two 18th century silk gowns but both were solid colors (ivory and green) and I felt it was time to do something a little different. The fashionable gown pattern by S&L is ideal for narrow stripes so stripes it will be!! I should have enough for a matching petticoat too, though I might have to piece the back section with a different fabric.


While searching for silk stripes I was bad an also bought this AMAZING silk plaid! Along with patterns and kits, Smith and Larkin offers a nice selection of fabrics. Go check them out!!


Referred to as "cross barred" in the 18th century, my plan is to use this plaid silk for a 1760s sacque gown. There are many beautiful extent plaid gowns in museums and other places around the web. Not only that, but take a look at this nearly identical silk pictured in Selling Silks: A Merchant's Sample Book 1764 by Lesley Ellis Miller. I will be posted a full review of this book sometime this winter! (You can view the original book here.)


I was only able to purchase 6 yards which will, just barely, be enough for the gown. But I believe that either the ivory or green silk petticoats from my other two gowns will work nicely with this silk plaid. So, now I need to look through my stash to see what I have for linen that will work for lining the bodice of each gown. Oh and silk thread too..... Other then that I should have everything I need to get started!

I plan to take my time with each of these gowns. I don't have any specific events coming up to wear them to so there is no need to rush. I'm not even going to set a deadline for having them finished. There are a few projects that will have deadlines this year so it will be nice to have something relaxing and fun to work on in between my other sewing madness. Honestly, if I have one close to finished by the end of the year I will be happy. Details, details, details!! That's what these gowns will be about. So, you can expect a few blog posts on each of them as I work. )

What sewing projects do you have going this winter?

Wednesday, January 6, 2016

A Little More on Handkerchiefs

Does anyone else have a long list of unfinished blog posts? I know I do! Today's post, one of many started then buried in my draft folder, is short but I thought it high time to share! I've written a few times in the past about 18th century handkerchiefs. Today I'd like to show you a few handkerchiefs I came across in my research as well as a few references to them in historic newspapers. There are endless references and it's a lot of fun discovering them!

A neck handkerchief is a necessary article of clothing for every living historian as well as a great (and simple!) way to dress up or change the look of your historic clothing. Burnley and Trowbridge has a nice selection of lovely printed handkerchiefs and fabric to make your own.Wm. Booth Draper and  Sign of the Golden Scissors both offer a fine selection of fabrics too.

Some 18th and early 19th century handkerchiefs in Museums.

White with red border - MFA Accession Number 16.391
Blue wool plaid - MFA Accession Number 44.804
Blue and white handkerchief - MFA Accession Number 51.1992

MFA Accession Number 34.126
From the Victoria and Albert Museum

V&A T.173-1921
V&A IS.166-1950

From the Metropolitan Museum of Art

MET C.I.38.85.2

From Christie's - Red and white showing rates for Hackney cabs

From Colonial Williamsburg - Reproduction handkerchiefs

And more ...

Boston Evening-Post, August 3, 1761  
- "Imported from LONDON and GLASGOW, ... strip'd and flower'd border's lawn handkerchiefs & aprons, ... spotted & flower's India bandanno handkerchief, lungee romalls, china taffaty handkerchiefs, cross bar's silk ditto, flower's culgee ditto, check'd & flowered linen ditto, cotton ditto"

Boston Gazette, September 7, 1761 
- "lawn handkerchiefs with flower'd & strip'd borders, ... gauze handkerchiefs of all colours; bandannoes; negligee & rosset silk handkerchiefs"

Tuesday, November 17, 2015

Green Silk Sacques

I was searching online recently and found some images of a lovely 18th century gown and thought "Hey, that looks familiar!" It's making me have second thoughts about remodeling my own green silk sacque.
But only a little. :)


 Robe a la Francaise 1725, European, Made of silk - Source


Friday, November 6, 2015

An Old Project - 1770s Stays

Today I'd like to share another project, long over due. This post has been sitting in my draft fold since I started blogging. Oh my! I do hope you pardon the crummy photos, I took them with my cell phone. They are not great but at least they serve as some kind of documentation of the construction of my stays.

Stays are a crucial foundation garment to any 18th century wardrobe. They give you support and that great period correct shape. In my first few years of reenacting I didn't wear stays. I didn't think I needed them nor did I have the money or knowledge to purchase or make a pair of my own. I soon learned otherwise. 
My first pair of stays were made using the JP Ryan pattern. I have used a couple different JP Ryan patterns and for the most part found them easy to use. You get a fairly accurate looking historical garment even though you are using modern sewing techniques. I felt this was a fairly good pattern with easy to follow instructions. The pattern pieces fit together well and I found I didn't need to make many adjustments.
JP Ryan stays pattern

I used a cotton canvas for the lining and a linen cotton blend for the outer fabric. A good friend of mine makes baskets so getting basket caning to use for boning was easy. The basket caning was a little wider than I wanted so I had to trim each piece to the right width. For the binding I used thin off-white leather. It was a little on the heavy side but not too bad to work with. I set out to make my first pair of stays all by hand ... but after I finished stitching the boning channels on the front two panels I gave up and used the sewing machine. 

They turned out well, are fairly accurate in appearance, and have held up well after several years of use. But after some more research, I was determined my next pair of stays would be as accurate as possible! This meant using more authentic materials and completely hand sewing them! A daunting task for sure but I felt I was up to the challenge.
Stays, 1770-1780 V&A
I mentioned this was an older project, yes? Well, these stay were started at a Hive workshop in 2011! The workshop began with some background information – who wore stays, what were made of, and how they changed throughout the 18th century.  Hallie Larkin, who not only makes stays as part of her sewing business, also collects originals and had a few examples at the workshop. This is part of the reason I love collecting vintage and antique clothing of my own. As enjoyable as it is to examine original items in museums, online, or in books, nothing beats seeing these things up close and personal! After a brief discussion of what kind of stays each of us wanted to make, it was time for our fittings. For my new pair of stays I choose to make a more “fashionable” set from the 1770s.  

I should mention that one of the original pairs of stays on hand were from the 1770s; a lovely, but faded, pink pair with blue binding and stiffened with baleen. Not only that but one of the reproduction pairs available to try on were an exact copy of these. I’m not sure which was more exciting, trying on the reproduction pair of stays with the originals right there beside me or knowing that I’m the same size as a woman who lived 200 years ago. :)

Materials Used
Linen interface
Checked linen lining
Blue worsted wool
Basket reeds for boning and metal stay for bust support
Cardstock stiffener
Leather binding
Linen thread
1/4" linen tape

All of the materials were provided as part of the workshop with the exception of the blue worsted wool which I purchased from Burnley and Trowbridge. For anyone interested in making their own set of 18th century stays, Smith and Larkin at The Sign of the Golden Scissors offers a variety stays kits and supplies.


Please pardon the crummy quality of these next photos. Unlike the JP Ryan pattern, each section of the stays was assembled individually. The wool fashion fabric is placed on top of the heavy linen interfacing, the boning channels are marked and then stitched. I used Tiger Tape to help me keep the channels nice and straight. After all the pieces - 2 fronts, 2 sides, 2 side backs, and 2 backs - were completed it was time to start attaching them together. It's difficult to see in these pictures but each section is whipped together leaving a generous seam allowance should they ever need to be altered later on. Something the JP Ryan pattern does not do.


These really hold their shape!! You can see the seam allowance is just tacked in place.


Here you can see the almost completed stays. At this point, before adding the binding and lining, I was able to try them on for fit. You may notice that the eyelets are off set, (something seen on originals) this so they line up straight when you spiral lace your stays. This particular style of stays are cut a little lower in the front and back compared to my first pair. The "points" of the front sections sit just above the bust line. Most high fashion gowns of the 1770s and 1780s were cut lower in front so these stays accommodates that fashion.


And the inside without the lining.


This photo, from an older post, shows the white linen tape covering the seams and the white leather binding. At some point I will take some better photos of these stays. I also want to do some comparison photos wearing these and my JP Ryan stays. These fit SOOOO much better and are super comfortable to wear for long periods of time.


Saturday, August 29, 2015

French and Indian War Event at Crown Point

My living history hobby began in the 1860s but transitioned back to the 18th century. Then it suddenly jumped forward to the 1940s. Today I find myself attending more 20th century events but I always seem to find my way back to my favorite time period. I have a deep love for the mid 18th century for a number of reasons. I find the history fascinating, it's when America  as a country was really born after all. The clothing is intriguing and enjoyable to both wear and to create. But it was through 18th century living history that I met my husband Cori. We have both made so many life long friends through our crazy hobby.

Photos in this post photos courtesy of Kris Jarrett Photography and Media Production. Thanks Kris! (Kris is also the talented man who took out wedding photos which you can see here and here.)


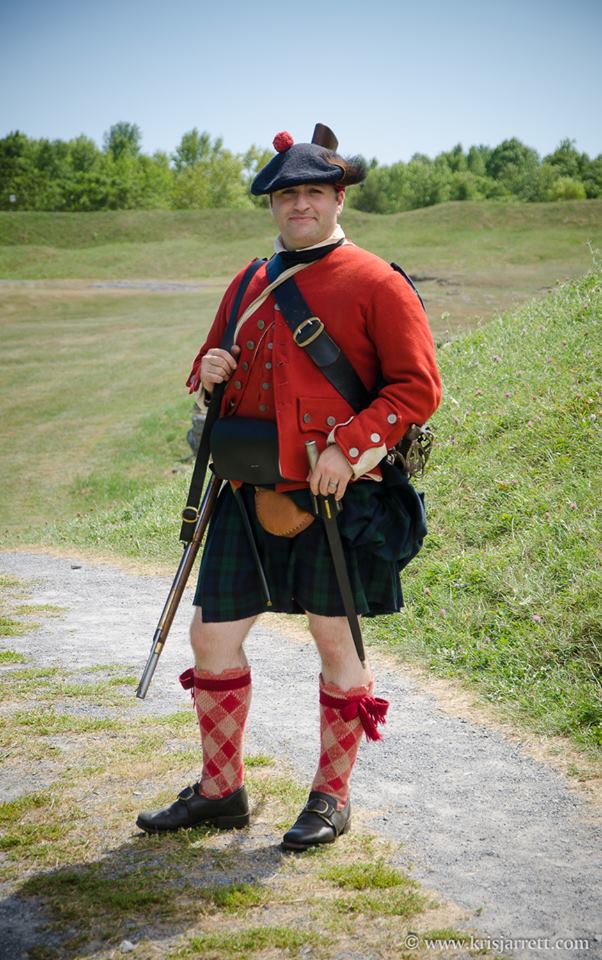
And who doesn't love a man in a kilt? Cori's main impression for the French and Indian War period is a soldier of the 78th Frasier's Highlanders. This particular regiment, with an impressive record, was formed mostly of former Jacobites. They served with distinction at the Siege of Louisbourg in 1758 and again on the Plains of Abraham when the British finally captured Quebec in 1759.


This summer we had the chance to visit one of our favorite locations, Crown Point, for a French and Indian War event. It's right on the shore of Lake Champlain. We were only able to stay for the day but it's also one of our favorite places to camp. After visiting with friends we headed into the old fort for some photos.

Originally the site of the French built Fort St. Frederic, the area was taken over by the British who began building their own fortifications around 1759. The site served as a major base of operations for British forces for the remainder of the the French and Indian Wars. It was also the end point of the famous Crown Point Military Road, which was built through what is now Vermont. Crown Point was occupied by General John Burgoyne's army in 1777 after American forces evacuated Fort Ticonderoga to Mount Independence. The barracks are mostly in ruins today due to fire.


It's was very windy! You can see we needed to hold onto our hats!


I wore my favorite gown. I've posted a few times about this gown, here and here. I also wore my linen and yellow silk mitts.


 And a few silly ones. Because these describe us perfectly. :)


"I'm not touching you!"
Yup, this is us. :)
Related Posts Plugin for WordPress, Blogger...