Showing posts with label Vintage Sewing Pattern Pledge. Show all posts

Tuesday, September 20, 2016

Roaring 20s Lawn Party - Pt 2, the Dress

I made my dress for the Roaring 20s Lawn Party from this 1930s pattern. Yes, I made and wore a 1930s dress for a 1920s event, I'm such as rebel! I love the 20s, I really do! But I'm not super excited about how I look in most 20s dresses. I'm short with wider hips and those boxy dropped waist styles just feel frumpy and odd to me. I just need to find the right dress/style to suit my body type.

1930s Simplicity sewing pattern

Anyway, after pulling out a few patterns and sketching a few different design ideas, I realized I just didn't want to make a 1920s dress. As I prepared for the Art Deco weekend earlier this spring it occurred to me that my vintage wardrobe was seriously lacking items from the 1930s. OK, I've made a few late 30s pieces but they have more of that 40s/WWII vibe to them. I didn't have anything that screamed 30s and was really wanted too change that.


Enter Simplicity 1945. This pattern was among the very first vintage patterns I purchased a few years back when I became interested in vintage sewing. It might have come from Ebay but I can't remember now.

1930s Simplicity sewing pattern

As the lawn party would be in August I knew it would be hot. Having something that would be light and comfortable to wear and move around it was key. I think it was the sleeves of this dress that really sold it for me. And this deco style cotton (from the stash, whoowhoo!) was perfect for it. I traded some of this fabric with another vintage blogger recently. Really excited to see what she creates with it!


The simplicity of this pattern (no pun intended!) surprised me too. I think one of the reasons I had not attempted this pattern before was believing it would be too complicated. Turns out, it was one of the easiest  vintage dresses I've sewn and it went together fast!

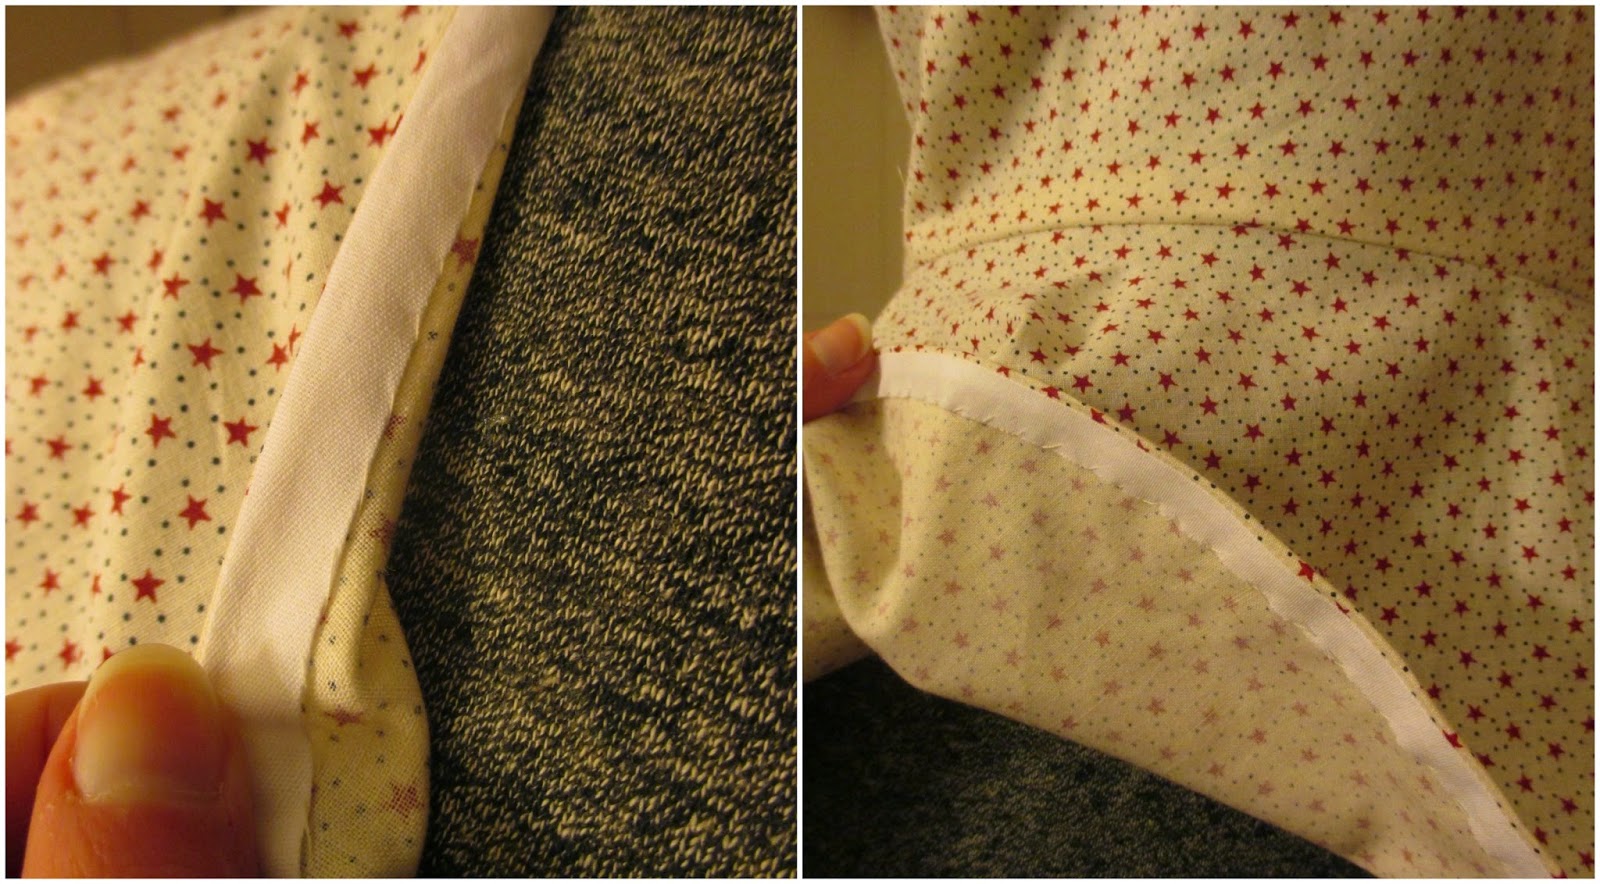
The bodice is constructed of a front and back piece, both cut on the fold. The sleeves are cut in one with the bodice with seams across the shoulders and at the sides. Before sewing these pieces together a series of 1/4" tucks are stitched across the front and back. The perforations of the pattern pieces were a little wonky so I remarked my fabric to avoid wonky pleats.


The skirt is pretty straight forward with small darts at the back. The waist seams of the bodice and skirt are lapped and then top stitched in place. The dress closes with a side placket and snaps.
I finally got to use one of the special attachments for my sewing machine. This foot creates a nice rolled hem which is how I finished the edges of the sleeves.


Since I had a bunch of metal grommets kicking around I opted to use those instead of sewing eyelets for the front lacing. I also only added about half the number because I didn't think I would like the dress as much if it laced all the way down the front. Lacking proper ribbon I used a piece of navy blue rayon bias tape.


I had planned on wearing my navy blue suede 1930s shoes with this but opted for a pair of modern sandals because the ground was still a little wet. The red celluloid buckle is from my stash.

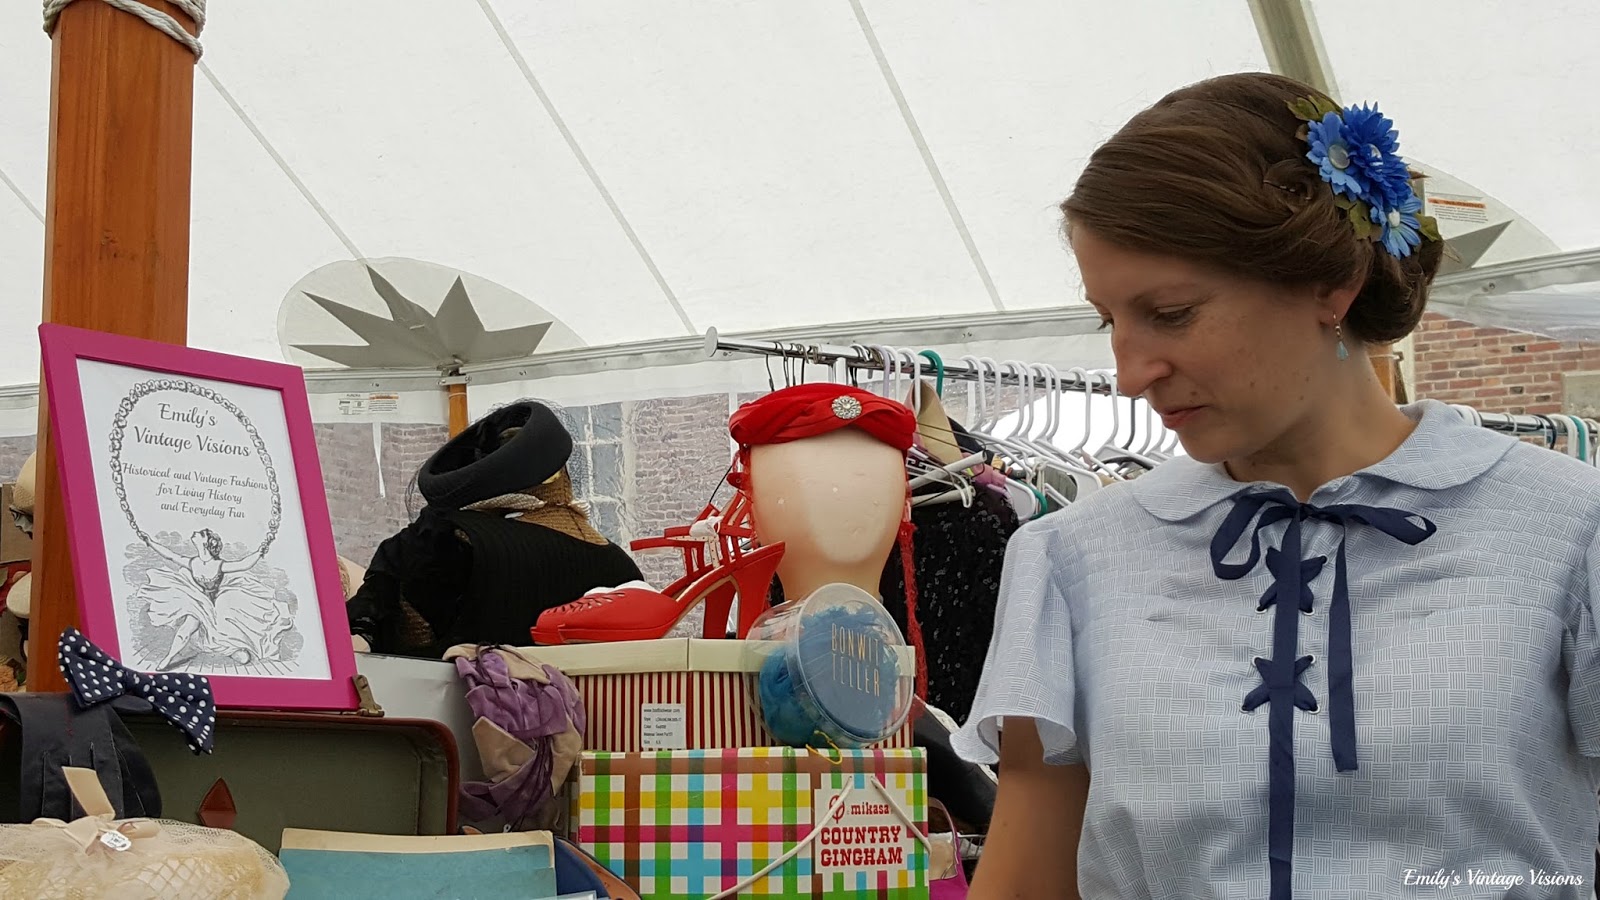
Even though I was a vendor at the lawn party, Cori and I were able to escape for a little bit while some friends watched my booth. (Thanks again Heather and Devon!) The gardens at the Crane Estate were in full bloom and made a wonderful backdrop for some photos.


Some of you might recognize my hair flowers. They are the ones I friend Monica made me for my wedding. I had attempted to reblock a hat for the event but it didn't turn out very well so I opted for the hair flowers instead to tie the outfit together. Plus it was nice to wear something from my wedding again. :)


Outfit Details
Dress - Made by Me
Hair Flowers - Made for my wedding by my friend Monica
Shoes - Thrifted

Pattern - Simplicity 1945
First Worn - July 31st
Complicated parts - Just marking sure the tucks on the bodice were straight and neat. The pattern perforations were a little off so I had to remark them.
Changes - I only needed to allow a little more room in the hips and shorten the skirt a few inches.
Cost - I don't remember what I paid for the pattern but I don't think it was more than $15 with shipping. Fabric and notions were all from the stash and the fabric was purchased on sale. I would estimate the total cost to be around $25 to $30.

Sunday, June 21, 2015

The Dorr Mill Plaid Hoodie

At long last I present to you my late 1930s Dorr Mill Plaid Hoodie! I actually finished this earlier in the spring but it wasn't until recently that I was able to get some decent photos. This jacket counts towards my 2015 personal vintage pattern sewing pledge. In these pictures the jacket is worn over the blouse (Hollywood 1530) and slacks (Simplicity 1306) that I made last year for the Reading Air Show. It was very warm at the airshow this year but around 7:30 in the morning it was just cool enough and comfortable to wear the jacket. The first day of the airshow I wore my new yellow Du Barry suit.


Several years ago, probably ten now, I purchased this wonderful wool plaid from the Dorr Mill Store. They sell a lot of supplies for rug hooking and rug braiding but you can also purchase their lovely wools by the yard. If you like working with natural fibers like I do, a trip to their physical store is a real treat. The wool for this jacket was originally intended for a cold weather Civil War era dress. The fabric was from the remnants bin so I had to purchase three separate pieces to get the yardage I wanted. I got as far as making a simple petticoat, which I wore a few times for 18th century and Civil War era events, but that's about it. That's a good thing because a) I almost never get to wear my 1860s stuff any more (sad face) and b) if I had cut into the fabric to make a bodice of any kind I most likely would not have been able to use the fabric for another project. Fortunately when I made the petticoat I simply seamed together two panels of the wool and pleated them to a fitted waistband. The third unused panel was left untouched. I was able to cut all the jacket pieces except the sleeves out of one panel. Because I wanted to be able to match up the plaid I had to take apart the petticoat to cut the sleeves.


Yep, early spring in New England! You can see the mountain of snow outside my kitchen widow, a chilly contrast to the bright red tulips and tea pot on the table. That particular evening was spent drinking tea and eating brownies while putting the finishing touches on the jacket.

The cutest tea pot ever!
The sleeves are cut with an upper and lower sleeve section and are slightly gathered at shoulders. The jacket back is cut in one piece on the fold. The jacket fronts are made from two pieces each. And of course the hood, also cut on the fold. Hooray hood! The whole jacket is lined with cotton muslin. I was hoping to use white flannel as a lining to make the jacket a little warmer but couldn't put my hands on it in the stash. I know it's around somewhere, probably hiding with the red and black check flannel I picked up at the same time for another project, boo.


The hood on this jacket is HUGE! And I love it! :)
The whole jacket is gathered slightly to a wide fitted waistband and closes with buttons up the front. The buttons appear to be shell. I added a snap to the very bottom of the jacket. One of my favorite things about this jacket, aside from the hood that is, is the way the front is constructed. It was a little fiddly but I'm happy with the result. I did restitch one front section because the fabric shifted causing the plaid stripes to be off set. I flat felled the seams for a neater finish.


And here is proof that my friend Jason and I were at the same event! Jason is the man behind those awesome Greater Boston Vintage Society events like the White Lightning Ball (see my posts here and here) and the Roaring 20s Lawn Party (see my posts here and here.)


Summary of the Pattern
Fabric: 100% wool from the Dorr Mill Store, cotton lining
Pattern: Simplicity 2823
Year: late 1930s
Notions: Buttons, thread, one snap
How historically accurate is it? Very. Plaids were pretty popular in the 30s and 40s for outerwear.
Any tricky parts to the pattern? Fitting the gathered front sections to the waistband and jacket front. Not too difficult just a little fiddly.
Did you change anything? I reduced the size just a touch and added a snap to the bottom front.
Time to complete: About a week, I'm guessing 8ish hours? I'm back at keep track.
First worn: Earlier this spring, first good pictures taken June 7 at the Reading Air Show.
Total cost: I can't remember what I paid for the fabric because I bought it so long ago. I'd guess with the pattern the cost for this project would be in the $30 to $40 range.
Notes: The jacket fits great over a dress as intended and works well with 40s high waisted pants. If I were to make this again for modern wear I would lengthen it a little bit.

Thursday, June 18, 2015

WWII Airshow and a Yellow Suit for 1942

This spring I've been sewing like a mad woman. Between participating in sew a-longs (see my Spring for Cotton blouse here) and getting ready for the big WWII airshow in Reading, PA, I've accomplished a lot! I've been making a healthy dent in the fabric stash as well as my personal vintage pattern sewing pledge. Over the next two weeks I'll be sharing several of these projects.

Photo courtesy of Joanna of Dividing Vintage Moments
While I love my true vintage items, I feel it's important to add more reproduction items to my vintage wardrobe, especially for living history events. Being outside in all kinds of weather and moving around all day can put a lot of stress on a vintage garment. Sweat and sunscreen are also bad for older fabrics. So in preparation for the airshow, like a true crazy person, hauled out my stash of patterns and fabrics and set to work.

The Mid Atlantic Air Museum WWII weekend is an outstanding event. If you enjoy history, cool military vehicles and WWII era aircraft, you must go! This year was the 25th anniversary of the airshow and it did not disappoint. One of the highlights was seeing Fifi, the only remaining B-29 bomber still in flying condition, as well as 2 of the 3 remaining B-24s still flying! As a re-enactor I planned to be at the airshow all three days. I knew I wanted to make things that would be comfortable, always key, but also were true to the styles of the war years. I have a lot of 1940s patterns, (shocking!) some I know date between 1940-45 (thank you McCall and Du Barry for including copyright dates!) but others I'm less sure about. My crazy goal was to make things I could pin point to between 1938 and 1944. Below are the patterns I selected. I made two new blouses with Du Barry 5172. (dated 1942), a skirt from Du Barry 5296 (dated 1941), and a suit using Du Barry 5371 (dated 1942). I rounded out my wardrobe for the weekend with the blouse and slacks I made last year and a jacket made from 2823. I brought the Red Birds dress with me too thinking I would wear it for the hanger dance Saturday night but ended up wearing my slacks instead.


Today's post is about the yellow suit as that's what I wore the first day. The yellow crepe for this suit was left over from my Winter Formal Dress made from Simplicity1469.  I received several nice compliments while wearing this. But this suit was so bright outside in the sunlight, yikes! Particularly when standing beside so many drab green military vehicles and tents. I pin curled my hair the day before and brushed it out in the morning. It looked pretty good for the first hour or so but after that the curls went flat. Too much humidity in the air I guess. By the end of the day it was so hot that I said the heck with it and pinned my hair into a messy bun just to get if off the back of my neck. At least my victory rolls lasted all day! My decision to pair the suit with red shoes and a blue hat came from the same newspaper article I used for my recent spring photo contest.

My hair still looking half way decent in the morning.


Du Barry 5371 is dated 1942. The skirt is a classic 5 panel skirt. The jacket can be made with long or short sleeves with or without trim. One of the things I really like about this suit is the mock blouse, or dicky, that is attached to the jacket. This could easily be changed out with one of a different color or style to create a completely new look. Other then fiddling with the waist/hip size of the skirt, the only change I made was to add additional snaps to the end of the dicky. I found it to be a touch too short and didn't want to stay tucked into the front of the skirt. A few extra snaps to the bottom of it and the inside of the waistband of the skirt helped keep everything together. The buckle I used is a vintage one from my stash. The color is a shade darker then the jacket trim but I still like it. I may need to let the jacket out just a touch where it sits at the waist/hips so it sits a little more smoothly. Overall this suit went together pretty quickly. The most time consuming part was attaching the red bias tape trim. One side is sewn using the machine but the other side is hand tacked to the inside.

The untrimmed jacket and a peak at my messy sewing area.

Attaching the red bias trim.
Photo by Neal Howland
Blogger photo op!! Look who I finally had the chance to meet! The wonderful Joanna from Dividing Vintage Moments!! It was great to meet someone I've come to know through the world of vintage blogging. And look at her suit! Isn't it fantastic!?! We made such a colorful pair. Joanna's husband kindly snapped a few photos as proof of our meeting. Maybe next year we can organize another meeting with other vintage bloggers. (I'm looking at you Miss Emileigh! ;) )

Photo courtesy of Joanna of Dividing Vintage Moments
Outfit Details
Suit - Made by me, Du Barry 5371
Shoes - red pair from Etsy, brown pair are repros from Dancestore.com
Stockings - Trailer Park Flamingos
Pins - Victory pin from Ebay, flowers by 1940s Style for You

Photo by Neal Howland
Summary of the Pattern
Fabric: Mustard/yellow crepe from discount fabric store
Pattern: Du Barry 5371
Year: 1942
Notions: Zipper, snaps, red bias tape, vintage buckle
How historically accurate is it? Very! The crepe is very close to dresses of the period and the trim was inspired by the pattern artwork.
Any tricky parts to the pattern? I had some fitting issues with the skirt when it came to attaching the waistband but was finally able to work those out. I think that was more on my (rear) end and not so much the pattern. :P
Did you change anything? Other then sizing I just added a few extra snaps
Time to complete: About a week and a half working during the evenings.
First worn: June 5, 2015 at the MAAM WWII weekend
Total cost: Around $30, although this is the second outfit made using this fabric so in reality it's closer to $15
Notes: Overall very happy with how this turned out! Next time I'll make the dicky a touch longer.

Thursday, April 30, 2015

Spring for Cotton - Simplicity 1782


Here is my finished Spring for Cotton project! A 1940s blouse using Simplicity 1782. I'm also counting this towards my list of Vintage Pattern Sewing Pledge projects. :)

http://luckylucille.com/2015/03/spring-for-cotton/


As you can see I've been experimenting with different scrafs to make a turban. This particular scarf is fairly long but only around 8 or 10 inches wide. I've also been sewing some dusting cap/turbans which is the subjust of another post. ;)


For these photos I paired the blouse with my WAVE skirt, a new to me pair of 1940s navy blue shoes, a felt flower boutineer from my wedding, and a couple of my red and black bracelets. The large red zig zag bracelet I believe is Bakelite and I think are as well except for the black one. I know there are several ways to test Bakelite but I've only tried the rub/smell test. I don't ofter wear bracelets because most are too big for my wrists. Also since I work at a compute most of the day I find they get in the way when I'm typing.


This wasn't originally on my list of patterns to make for the Vintage Pattern Sewing Pledge or Spring for Cotton because at the time I didn't own a copy. I first came across Simplicity 1782 while browsing the "evil bay" this winter. I missed out on a copy at the last minute, darn you snipers! I did find another copy in a different size but couldn't bring myself to spend $40.00 for a blouse pattern. Le sigh. I saved an image of the pattern and moved on. Much to my delight another copy came up for sale, again on the evil bay, and I was determined not to miss out this time! Now I finally have a copy and oh do I have plans for this blouse!

As you will see, I decided to test this pattern in some quilting cotton from the stash. But I have other fabrics destined to become tops. I'm thinking of making either View 1 or 2 from this semi-sheer white on white cotton and another version of View 3 in the yellow and white. :) Something bright for spring!


So, the details. This pattern went together fast! Laying out the pattern and cutting always seems to take a long time but even that went fairly quickly as there were so few pieces. The blouse is made using a front, back, two peplum pieces and a sleeve piece. Depending on the view you pick, you have options for the sleeves and peplum. For my wearable mockup I went with View 3 with the shorter sleeves and wider peplum.


The back is cut on the fold with darts added to the waist and shoulders. The front is two pieces seamed up the middle with a small amount of shearing at the sides. After sewing up the sides and shoulders, I attached the peplum and tried it on for fit. I found the top to be a touch snug so I let the side seams out a little and that helped some. After that all that was left to do were the sleeves, the side placket, and binding the neck and hem with bias tape. Pretty simple. The short sleeve pattern piece looks like an elongated oval. You cut one piece for each sleeve which is then folded in half WRONG sides together and sewn into the arm hole. I didn't have any off white bias tape for the neck and hem but the white doesn't really show.

Overall I'm pretty happy with how this turned out and I think I have a very wearable muslin/mock up. It does have some minor fitting issues to work out. I found that the waist seam hit at exactly the same level as my skirt waistband and the waistband of my favorite high waisted pants. This makes it look and feel a little awkward. I think shortening the waist would help a little bit. Also, and maybe it's just the color and/or material I used but when I first tried this blouse on it looked very much like a maternity top. Adding a dark belt helped somewhat. Quilting cotton may be just a little too stiff for this blouse, just my two cents. The next time I make it will be with a much softer cotton.


Outfit Details
Blouse - Made by Me, Simplicity 1782
Skirt - WAVE uniform skirt, thrifted
Bracelets - Local antique shops
Shoes - Ebay
Flowers - from my wedding, 1940s Style for You on Etsy
Scarf - thrifted

And this photo. Because, flamingos!


Summary of the Pattern
Fabric:
Quilting cotton
Pattern: Simplicity 1782, View 3, Size 14/32" bust
Year: 1946
Notions: Thread, bias tape, snaps.
How historically accurate is it? Not bad. The fabric is not a reproduction print but I think it has a cute vintage feel to it.
Any tricky parts to the pattern? Not really. This pattern seemed to go together really fast and easy.
Did you change anything? The pattern calls for 5/8" seams but I found the blouse to be a little snug in the waist and difficult to put on and take off. I changed the seams to 3/8" and this helped.When I make this again, which I plan to do, I will build in a little extra seam allowance.
Time to complete: 3 to 4 hours
First worn: Yesterday for photos.
Total cost: All the materials were from the stash! Yeah! I think I paid around $12 for the pattern.
Notes: Next time I will a more ease to the waist. Also shorten the waist a little bit.

Here is a peak at some of the other tops I plan to sew this year. :) These are both 1950s and will be great for summer. Don't forget about my "Color Recipes for Spring" photo contest, there are still a few days left. You can read the details on how to enter here. (The deadline has been move to Sunday May 3rd!) For inspiration see this post and my interpretation of the color descriptions here.

Related Posts Plugin for WordPress, Blogger...