Showing posts with label MAAM WWII Weekend. Show all posts

Monday, July 17, 2017

MAAM WWII Weekend 2017 - Pt 2

As promised here is my second post about the Mid Atlantic Air Museum's WWII weekend. This time I thought I would share some fun photos from around our camp. To give you an idea of just how big this event is, have a quick peek at this map of the site.


Part of the US Navy "air station" on Wake Island

Communications bunker on Wake Island
Here is most of our group!


Here are a few shot by Emileigh of Flashback Summer who joined me that weekend.
Image may contain: 2 people, outdoor
Our kitchen for the weekend. Three square meals each day, thanks cooke!

Image may contain: 3 people, people sitting, table and food
Breakfast time!!
Image may contain: 4 people, people smiling, people standing and outdoor
I love this one, the guys were having too much fun reading the ads in this 1940s Life Magazine!


Here are a few shots from the French Village. I wish I had taken more but was having so much fun visiting with friends I only took a few.


Watching the vintage planes during the air show portion on the weekend is always a highlight!


That's all for now! Hope you enjoy! :) Be sure to check out Flashback Summer's post for more photos.

Thursday, July 9, 2015

1940s Blouses by Du Barry

Here is another outfit post from the MAAM WWII weekend. I have more more planned but I'm still waiting on a few photos from a photographer. (I had the opportunity to do a really awesome photo shoot!! I can't wait to share!) Be sure to check out the official event photo gallery, you'll spot a few photos of Cori and I in there if you look carefully. Although I only ending up wearing one, I made myself two new blouses using Du Barry 5172. This is a great little pattern that dates from 1941. I think it's my favorite blouse pattern by far! It incorporates many of those vintage details that I really enjoy.

The sleeves have a set of small pleats at the ends and little pouf shoulder. The front of the blouse is constructed with shoulder yokes and the collar is a simple rounded shape. Another thing I like about this blouse is that instead of being straight from underarm to hem, the blouse is cut to fit the torso. My first blouse was made from a white figured cotton muslin that I purchased on sale from Joann's Fabrics. (Note to self. Gotta get some pictures!) I wanted to trim the white blouse with lace as shown on the pattern envelope but couldn't fine any I liked. The red and white stripe is a cotton fabric that came from my mom's fabric stash.

Photo by Neal Howland


Photo by Neal Howland
Although the pattern doesn't say to, I decided to cut the shoulder yokes and placket for the buttons on the bias. This helped to break up the stripes and add a little more visual interest to the blouse. I had a couple people ask me about working with stripes. I personally really like working with stripes and plaids for some reason. Most of my historical clothing is made using stripes, checks and plaids. (see my cross barred gown.) Stripes can be your best friend or worst enemy. Be patient. I often find that stripes can really be helpful when lining up pattern pieces. It can be fun challenge! Depending on your project you may need to allow for some extra fabric if you are worried about matching up the stripes like I did with my Dorr Mill Hoodie. Pin carefully! Then baste or sew. Craftsy has some good tips here, there are also a few here as well.

My skirt was made using Du Barry 5296. I love this skirt! It has a slim fit and a generous pleat in back for easy of movement. I have a lovely blue and white pin striped wool that I want to use to make the whole suit as shown on the envelope. The blue linen I used was left over from an 18th century frock coat that I made for my brother a few years back. It wrinkles easily but linen is so comfortable to wear especially when the weather is hot! This skirt has become a good vintage basic and mixes and matches well with other items I have. I've worn this skirt about 5 or 6 times now!


For the dance Saturday night I changed into my linen pants (Simplicity 1306) and flats. After wearing heels all day, something I'm not use it, my Bleyer Liddy Hoppers felt like heaven. They are super comfortable dance shoes! I bought mine when I was still in high school and dancing all the time. (Wow, how many years ago now?! Yeah, it's been a few.) Sadly I don't get to do much dancing these days so I'm soooo out of practice. Cori doesn't really dance and the closest swing dance scene is a good 2 hour drive from home. But I did manage to get him out on the dance floor that night, it's a lot of fun dancing to a live band!


One of the official event photographers, Big Bloc Photography LLC, took these photos of us and our friend Max beside the MAAM's B-25J bomber Briefing Time. You can see his complete gallery, along with tons of other great photos from the air show here. I love the Kodachrome coloring! Cori and Max are wearing their 1940s LADP uniforms. They were the only two from the police group able to make it to the airshow this year. We're hoping for a bigger turn out next year.


Outfit Details
Blouse - Made by me, Du Barry 5172
Skirt - Made by me, Du Barry 5296 
Pants - Made by me,  Simplicity 1306
Shoes - Wingtips from Blyer
Victory Pin - local antique shop

Photo by Neal Howland
Summary of the Patterns
Fabrics: Cottons for blouses, linen for skirt
Pattern: Du Barry 5172 (blouse) and Du Barry 5296 (skirt)
Year: 1941
Notions: Buttons, thread, and snaps, zipper and matching lace hem tape for skirt
How historically accurate is it? Pretty darn good! Cotton is perfect for the blouses. I don't know how popular linen was used for clothing but it's what I had and I love it.
Any tricky parts to the pattern? The button holes for the blouses. I dislike them but I'm getting better the more I do.
Did you change anything? Surprisingly, no. Both patterns went together very well. I had some fitting issues with the waist of the skirt but nothing major.
Time to complete: About a four hours for each blouse including buttons and button holes. About the same for the skirt
First worn: June 2014
Total cost: About $6 for each pattern, less then $10 for the white fabric. Buttons, striped fabric and linen fabric from the stash.
Notes: Linen does wrinkle easily but it's so comfortable especially when the weather is hot. I love this skirt and need to make another!

Sunday, June 21, 2015

The Dorr Mill Plaid Hoodie

At long last I present to you my late 1930s Dorr Mill Plaid Hoodie! I actually finished this earlier in the spring but it wasn't until recently that I was able to get some decent photos. This jacket counts towards my 2015 personal vintage pattern sewing pledge. In these pictures the jacket is worn over the blouse (Hollywood 1530) and slacks (Simplicity 1306) that I made last year for the Reading Air Show. It was very warm at the airshow this year but around 7:30 in the morning it was just cool enough and comfortable to wear the jacket. The first day of the airshow I wore my new yellow Du Barry suit.


Several years ago, probably ten now, I purchased this wonderful wool plaid from the Dorr Mill Store. They sell a lot of supplies for rug hooking and rug braiding but you can also purchase their lovely wools by the yard. If you like working with natural fibers like I do, a trip to their physical store is a real treat. The wool for this jacket was originally intended for a cold weather Civil War era dress. The fabric was from the remnants bin so I had to purchase three separate pieces to get the yardage I wanted. I got as far as making a simple petticoat, which I wore a few times for 18th century and Civil War era events, but that's about it. That's a good thing because a) I almost never get to wear my 1860s stuff any more (sad face) and b) if I had cut into the fabric to make a bodice of any kind I most likely would not have been able to use the fabric for another project. Fortunately when I made the petticoat I simply seamed together two panels of the wool and pleated them to a fitted waistband. The third unused panel was left untouched. I was able to cut all the jacket pieces except the sleeves out of one panel. Because I wanted to be able to match up the plaid I had to take apart the petticoat to cut the sleeves.


Yep, early spring in New England! You can see the mountain of snow outside my kitchen widow, a chilly contrast to the bright red tulips and tea pot on the table. That particular evening was spent drinking tea and eating brownies while putting the finishing touches on the jacket.

The cutest tea pot ever!
The sleeves are cut with an upper and lower sleeve section and are slightly gathered at shoulders. The jacket back is cut in one piece on the fold. The jacket fronts are made from two pieces each. And of course the hood, also cut on the fold. Hooray hood! The whole jacket is lined with cotton muslin. I was hoping to use white flannel as a lining to make the jacket a little warmer but couldn't put my hands on it in the stash. I know it's around somewhere, probably hiding with the red and black check flannel I picked up at the same time for another project, boo.


The hood on this jacket is HUGE! And I love it! :)
The whole jacket is gathered slightly to a wide fitted waistband and closes with buttons up the front. The buttons appear to be shell. I added a snap to the very bottom of the jacket. One of my favorite things about this jacket, aside from the hood that is, is the way the front is constructed. It was a little fiddly but I'm happy with the result. I did restitch one front section because the fabric shifted causing the plaid stripes to be off set. I flat felled the seams for a neater finish.


And here is proof that my friend Jason and I were at the same event! Jason is the man behind those awesome Greater Boston Vintage Society events like the White Lightning Ball (see my posts here and here) and the Roaring 20s Lawn Party (see my posts here and here.)


Summary of the Pattern
Fabric: 100% wool from the Dorr Mill Store, cotton lining
Pattern: Simplicity 2823
Year: late 1930s
Notions: Buttons, thread, one snap
How historically accurate is it? Very. Plaids were pretty popular in the 30s and 40s for outerwear.
Any tricky parts to the pattern? Fitting the gathered front sections to the waistband and jacket front. Not too difficult just a little fiddly.
Did you change anything? I reduced the size just a touch and added a snap to the bottom front.
Time to complete: About a week, I'm guessing 8ish hours? I'm back at keep track.
First worn: Earlier this spring, first good pictures taken June 7 at the Reading Air Show.
Total cost: I can't remember what I paid for the fabric because I bought it so long ago. I'd guess with the pattern the cost for this project would be in the $30 to $40 range.
Notes: The jacket fits great over a dress as intended and works well with 40s high waisted pants. If I were to make this again for modern wear I would lengthen it a little bit.

Thursday, June 18, 2015

WWII Airshow and a Yellow Suit for 1942

This spring I've been sewing like a mad woman. Between participating in sew a-longs (see my Spring for Cotton blouse here) and getting ready for the big WWII airshow in Reading, PA, I've accomplished a lot! I've been making a healthy dent in the fabric stash as well as my personal vintage pattern sewing pledge. Over the next two weeks I'll be sharing several of these projects.

Photo courtesy of Joanna of Dividing Vintage Moments
While I love my true vintage items, I feel it's important to add more reproduction items to my vintage wardrobe, especially for living history events. Being outside in all kinds of weather and moving around all day can put a lot of stress on a vintage garment. Sweat and sunscreen are also bad for older fabrics. So in preparation for the airshow, like a true crazy person, hauled out my stash of patterns and fabrics and set to work.

The Mid Atlantic Air Museum WWII weekend is an outstanding event. If you enjoy history, cool military vehicles and WWII era aircraft, you must go! This year was the 25th anniversary of the airshow and it did not disappoint. One of the highlights was seeing Fifi, the only remaining B-29 bomber still in flying condition, as well as 2 of the 3 remaining B-24s still flying! As a re-enactor I planned to be at the airshow all three days. I knew I wanted to make things that would be comfortable, always key, but also were true to the styles of the war years. I have a lot of 1940s patterns, (shocking!) some I know date between 1940-45 (thank you McCall and Du Barry for including copyright dates!) but others I'm less sure about. My crazy goal was to make things I could pin point to between 1938 and 1944. Below are the patterns I selected. I made two new blouses with Du Barry 5172. (dated 1942), a skirt from Du Barry 5296 (dated 1941), and a suit using Du Barry 5371 (dated 1942). I rounded out my wardrobe for the weekend with the blouse and slacks I made last year and a jacket made from 2823. I brought the Red Birds dress with me too thinking I would wear it for the hanger dance Saturday night but ended up wearing my slacks instead.


Today's post is about the yellow suit as that's what I wore the first day. The yellow crepe for this suit was left over from my Winter Formal Dress made from Simplicity1469.  I received several nice compliments while wearing this. But this suit was so bright outside in the sunlight, yikes! Particularly when standing beside so many drab green military vehicles and tents. I pin curled my hair the day before and brushed it out in the morning. It looked pretty good for the first hour or so but after that the curls went flat. Too much humidity in the air I guess. By the end of the day it was so hot that I said the heck with it and pinned my hair into a messy bun just to get if off the back of my neck. At least my victory rolls lasted all day! My decision to pair the suit with red shoes and a blue hat came from the same newspaper article I used for my recent spring photo contest.

My hair still looking half way decent in the morning.


Du Barry 5371 is dated 1942. The skirt is a classic 5 panel skirt. The jacket can be made with long or short sleeves with or without trim. One of the things I really like about this suit is the mock blouse, or dicky, that is attached to the jacket. This could easily be changed out with one of a different color or style to create a completely new look. Other then fiddling with the waist/hip size of the skirt, the only change I made was to add additional snaps to the end of the dicky. I found it to be a touch too short and didn't want to stay tucked into the front of the skirt. A few extra snaps to the bottom of it and the inside of the waistband of the skirt helped keep everything together. The buckle I used is a vintage one from my stash. The color is a shade darker then the jacket trim but I still like it. I may need to let the jacket out just a touch where it sits at the waist/hips so it sits a little more smoothly. Overall this suit went together pretty quickly. The most time consuming part was attaching the red bias tape trim. One side is sewn using the machine but the other side is hand tacked to the inside.

The untrimmed jacket and a peak at my messy sewing area.

Attaching the red bias trim.
Photo by Neal Howland
Blogger photo op!! Look who I finally had the chance to meet! The wonderful Joanna from Dividing Vintage Moments!! It was great to meet someone I've come to know through the world of vintage blogging. And look at her suit! Isn't it fantastic!?! We made such a colorful pair. Joanna's husband kindly snapped a few photos as proof of our meeting. Maybe next year we can organize another meeting with other vintage bloggers. (I'm looking at you Miss Emileigh! ;) )

Photo courtesy of Joanna of Dividing Vintage Moments
Outfit Details
Suit - Made by me, Du Barry 5371
Shoes - red pair from Etsy, brown pair are repros from Dancestore.com
Stockings - Trailer Park Flamingos
Pins - Victory pin from Ebay, flowers by 1940s Style for You

Photo by Neal Howland
Summary of the Pattern
Fabric: Mustard/yellow crepe from discount fabric store
Pattern: Du Barry 5371
Year: 1942
Notions: Zipper, snaps, red bias tape, vintage buckle
How historically accurate is it? Very! The crepe is very close to dresses of the period and the trim was inspired by the pattern artwork.
Any tricky parts to the pattern? I had some fitting issues with the skirt when it came to attaching the waistband but was finally able to work those out. I think that was more on my (rear) end and not so much the pattern. :P
Did you change anything? Other then sizing I just added a few extra snaps
Time to complete: About a week and a half working during the evenings.
First worn: June 5, 2015 at the MAAM WWII weekend
Total cost: Around $30, although this is the second outfit made using this fabric so in reality it's closer to $15
Notes: Overall very happy with how this turned out! Next time I'll make the dicky a touch longer.

Thursday, July 3, 2014

WWII Cotton Blouse & Linen Slacks

Back at the beginning of June, Cori and I traveled to Reading, Pa to the Mid-Atlantic Air Museum for a WWII event. I talked a little about it in my last post where I shared with you my Red Birds Dress. That was my outfit for day one. Here is what I wore on day two! We had so much fun and met so many great people.

Another staff car photo! I was trying to recreate this photo from last fall.
First up the fabric and the patterns. The blouse is made from Hollywood 1530 using 100% cotton with a cute retro style print. I'm not sure if it qualifies as a true 30s/40s print but I think it's pretty close. Plus I liked it best out the options I had in the stash. Actually, this came from my mom's fabric stash, as did the fabric for this year's birthday dress and red bird dress. There should be an extra 2 inches of fabric on either side of the blouse fronts but I didn't have enough fabric. As you can see looking at the pattern pieces laid out it was a tight squeeze! Surprisingly this didn't have a huge impact on the fit of the blouse, I feared it might turn out too small but it was just fine. The only other change I made was to add a second pocket, but really that was because I accidentally cut two pocket pieces and didn't want to waste the fabric!

Sadly, the short sleeve piece is missing from this pattern. I replaced to using the short sleeve pattern piece from McCall 3306. (There is a copy of this pattern for sale here.) Both patterns are late 1930s so I felt this was a good substitute and I really like the little pouf that McCall 3306 creates at the top of the shoulder. It's one of those little details that I love about the 1930s and early 1940s. :) The green fabric you see is the same as my 2014 Sew For Victory dress. There was juuuust enough to make a blouse with the remainder of that fabric as well.


Getting ready to cut! Always the scary part. :)
Here you can see the part of the blouse center front that I had to eliminate.
Summary of the Pattern
Fabric: Blue cotton from the stash
Pattern: Hollywood 1530
Year: late 1930s or early 1940s
Notions: Thread and buttons from the stash
How historically accurate is it? Very! The fabric is pretty close to period prints. The buttons are modern but look just like vintage ones. I'd give the blouse a 9 1/2 out of 10.
Any tricky parts to the pattern? Button holes.... enough said
Did you change anything? Not much. The short sleeve piece was missing so I used one from a different pattern I added a second pocket because I cut an extra one and didn't want to waste the fabric. I didn't have the exact amount of fabric so the finished blouse is a touch shorter and narrower but still fits great.
Time to complete: Around 8 hours I think
First worn: June 2014
Total cost: Everything but the pattern came from the stash, so less then $5!
Notes: Love this blouse. I need more separates!

The slacks were made using Simplicity 1306 and linen left from an 18th century project. There is a discount fabric store near by that occasionally gets 100% linens and wools. I stop in every once in a while to see what they have. It's one of those places, like a thrift store, that if you see something you like you'd better buy it because there's a good chance it will be gone soon. I tend to "stock up" when I find good linens and wools there.
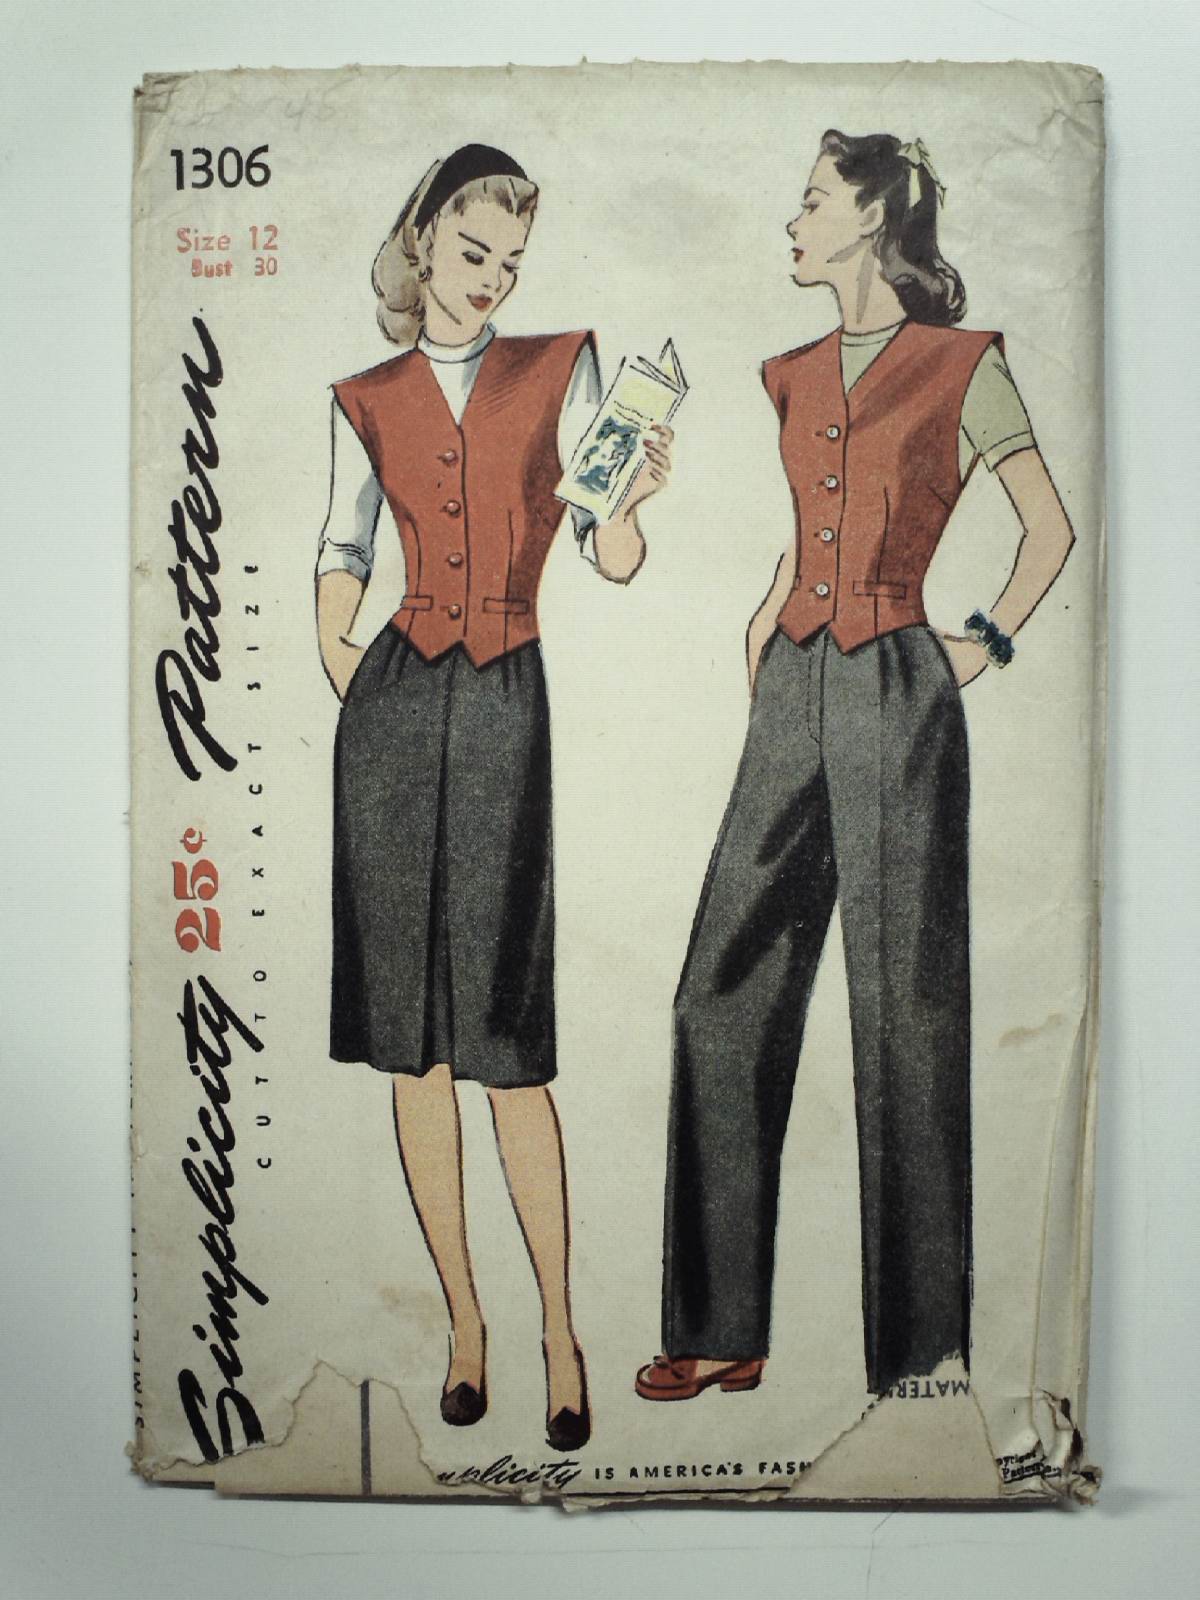
40s -Simplicity Pattern No. 1306- Womens skirt, slacks and vest. The skirt and slacks are fashioned with trouser pleats at front waistline, darts at back waistline and vertical pockets at either side. A center front inverted pleat trims the skirt front and the skirt back is seamed down the center. The slacks have a fly opening secured with a slide fastener. Welt pockets trim the dart fitted vest which features extended shoulders and a four button front closing.
Simplicity 1306
I find the fit of Simplicity 1306 is much better than Simplicity 3322 (reproduced by Eva Dress and the Vintage Fashion Library). I used Simplicity 3322 to make a pair of slacks last year for Sew For Victory but was never very happy with them. Although both patterns are very similar in cut and style the main difference, other than a zipper front and side opening, is the treatment of the slacks front. Simplicity 3322 has front darts where Simplicity 1306 has small pleats. Both patterns have darts in back. Slacks from the 40s are meant to be baggy but sometimes this style can be really unflattering. I found that by extending the length of the front pleats a little more helped create a smoother fit Next time I use this pattern I will need to make some minor adjustments to very top of the slacks and waistband. I ended up making two small tucks in the waistband so the slacks would stay where they needed to at my natural waist.


I completed my look at day with a red scarf, victory rolls, and my Army/Navy E-award pin and another WWII era victory pin. You can see close ups of the pins here.

I really wish I good recommend the vendor who sold me the sunglasses I'm wearing, but sadly I cannot. It's a long story and not one that I want to go into detail here. Let's just say the costumer service started great but ended poorly. The glasses don't fit as well as I would like them to and I can really only wear them for short periods of time.


Summary of the Pattern
Fabric: Brown linen left from another project
Pattern:
Simplicity 1306
Year: 1940s
Notions: Thread, zipper, and buttons from the stash
How historically accurate is it? Very! I'd give the pants a 9 1/2 out of 10.
Any tricky parts to the pattern? Button holes and zipper placket.... enough said
Did you change anything? Not much. The pattern needed to be shorten, no surprise there. I also needed to take them in at the waist.
Time to complete: Around 10 hours I think
First worn: June 2014
Total cost: Everything but the pattern came from the stash, so less then $15!
Notes: Love these pants. I need more separates! I need to make them a touch shorter next time but I will be using this pattern again. :)

By the way, I'm having another sale on Etsy. Use the coupon code FLASHSALE to save 15% until July 5th. I'll be adding some more items after the holiday weekend.

Related Posts Plugin for WordPress, Blogger...