Monday, July 1, 2019

So You Want to be a WAVES Reenactor

So you want to be a WAVES reenactor. How do you start building an impression? Where do you get your uniform? What do you need to get started? What are some basic resources? This blog post, along with the rest of my summer WAVES series, will help you get started.

How to Build an Accurate WAVES Living History Impression.

Before we dive in, let me start by saying this as a bit of a disclaimer. I won't lie to you, or try and sugar coat things. Building a WAVES impression, or any women's WWII military impression for that matter, is NOT CHEAP. Before you buy anything, I urge you to do tons of research, ask lots of questions and shop around. (It took me nearly three years to track down all the pieces I needed for the standard blue uniform.) Unlike other women's WWII impressions, no one is reproducing WAVES uniforms. That means almost everything you need for your uniform will be the real deal. (I see this as both good and bad, but more on that later.) It means tracking down a uniform that not only is your size, but also in good enough condition to be worn. These items are 70+ years old after all!

A full uniform, i.e. the standard blue jacket (sometimes called a tunic) and matching skirt, hat, tie, and blouse can cost somewhere in the neighborhood of $200 to $350. Add shoes (vintage or repro) and the purse and you are talking another $200 easily. (I've seen the purses alone sell between $100 and $300 depending on the seller and condition of the purse.) For some reason the prices on Ebay for WAVES items have sky rocketed in recent years! Some of the most sought after pieces, such as the seersucker uniforms and the summer whites, have sold for ridiculous prices. This is where shopping around, networking with others in the know, and setting yourself a budget can be really helpful. Don't despair, because in time the right pieces will find you!!

- - I don't say any of this to scare people away from the impression, I just want to be as honest and upfront as I can. I hate seeing new people in the hobby spend their hard earned money on incorrect items or things that just can't be used. Don't fear! There ARE ways that you can portray a WAVE that won't break the piggy bank. - -

So, let's get started!!
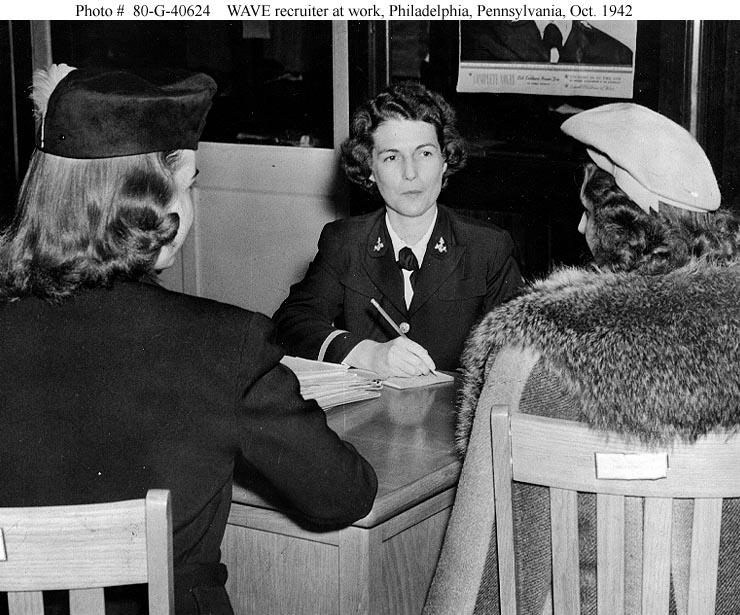
https://www.ibiblio.org/hyperwar/OnlineLibrary/photos/images/g40000/g40624.jpg
Source - Photo #: 80-G-40624 WAVES recruiting activities
Ensign May Herrmann talks to two young women concerning enlistment in the Navy Women's Reserve, at the Officer Procurement office, Philadelphia, Pennsylvania, 30 October 1942.
Official U.S. Navy Photograph, now in the collections of the National Archives.
Image result for wwii waves recruits
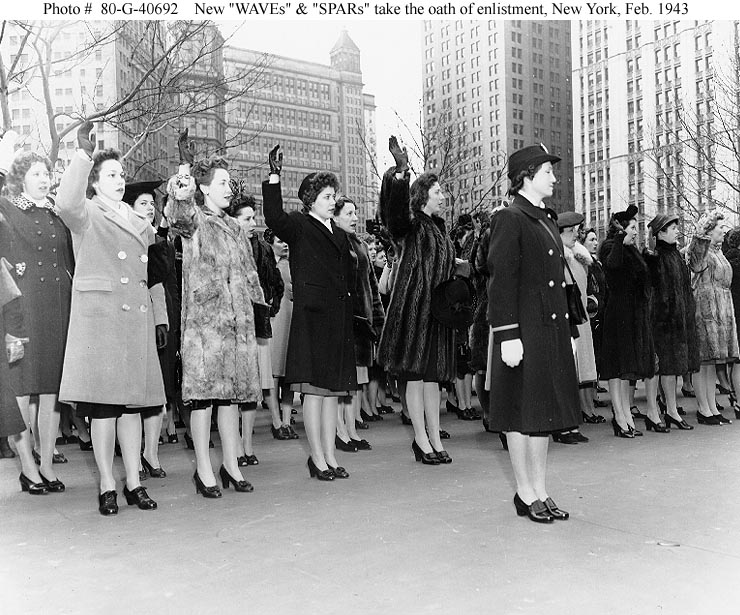
Source - Photo #: 80-G-40692 "WAVES and SPARS Day", New York City
New WAVES and SPARS take the oath of enlistment in a ceremony held in front of New York City Hall, 8 February 1943.
Official U.S. Navy Photograph, now in the collections of the National Archives.

Related image
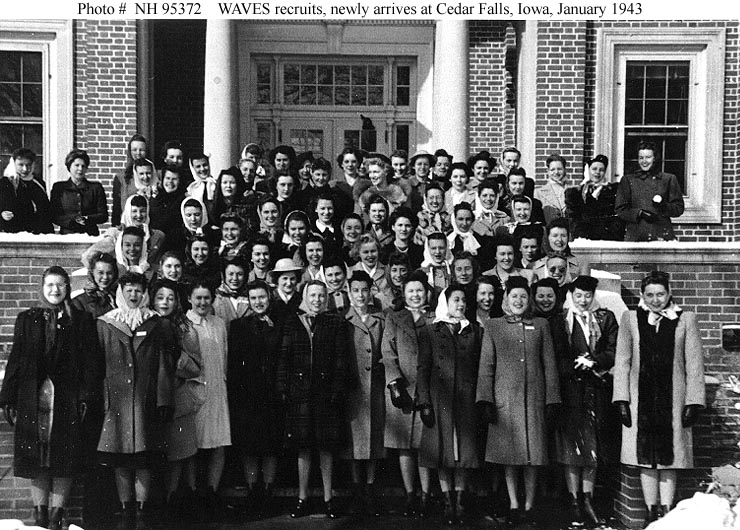
Source - Photo #: NH 95372 Navy WAVES training school, Iowa State Teachers College, Cedar Falls, Iowa

Newly-arrived WAVES recruits pose for a group portrait at the school, before the arrival of their uniforms, January 1943.
Shirley Feldstein (Bell) is 3rd from right in the front row, with a white name tag visible on her coat.
She comments, on the reverse of the original print: "We all look like penguins ready for a slide in the snow".
Donation of Shirley Feldstein Bell.
U.S. Naval Historical Center Photograph.

The easiest and least expensive way to start your WAVES impression is to wear 1940s civilian clothing along with an enlistment pin. The shop Peachy Keen sells them for a few dollars. (They also sell a bunch of other cool stuff so be sure to look through the whole shop!) If you have an interest in WWII reenacting, chances are you already have a basic 1940s outfit. If not, start with a pair 1940s style high waist pants or an A line skirt and a basic 1940s blouse. Add some basic accessories and you are on your way!

If you sew, I highly recommend Wearing History's Smooth Sailing Togs. Go with the e-pattern if you are really on a budget. A simple, but well put together civilian outfit, with a handful of period correct accessories, will take you a long way and will work for many WWII era living history impressions.

By adding a WAVES enlistment pin, you can portray a new WAVES recruit on your way to basic training while you continue your research and save up for those first uniform pieces!

Smooth Sailing Trousers (shown with Smooth Sailing Blouse AND Blouse from Sailor Girl Playsuit)
Sports Togs Paper Pattern: http://wearinghistory.clothing/smooth-sailing-1930s-sports-togs-pattern/
Epattern:
Sports Togs A: http://wearinghistory.clothing/e-pattern-size-pack-a-smooth-sailing-1930s-sports-togs-pattern/
Sports Togs B: http://wearinghistory.clothing/e-pattern-size-pack-b-smooth-sailing-1930s-sports-togs-pattern/
Pins available through Peachy Keen
Shoes and blouses are the easiest places to save a few pennies. Look around on Ebay and Etsy for good deals on vintage shoes but also check your local antique shops, thrift shops and flea markets. Places like Amazon offer basic black oxfords at lower prices but watch the height and shape of heels as many are not period correct. However, if you can grab a basic, so-so correct pair for say, $25 or $30 do it. You can always upgrade later. WAVES shoes, worn with everything except the white uniform, should be a plain black lace up oxford style with low heeled (1" to 1 /12") and closed toe. Though some women wore privately purchased shoes that had a small amount of perforations (decoration), try is go as plain as possible. The standard issued shoes were plain, and yes, kind of ugly.

The best option on the market right now for reproduction oxfords are the O.A.O. Oxfords from All Heels on Duty. The are a direct copy of WWII women's military footwear, are solidly made, and super comfortable. These will serve you well for everyday vintage wear as well as both your 1940s civilian and military impressions. (I hear their next style will be the military heeled pumps!!)

Image may contain: one or more people, people sitting and shoes
Imaging showing a WAVE polishing her standard issued oxfords.

Style A is want you want to look for, though a slightly lower heel would be good. Image from Glamourdaze
White cotton blouses (worn with both the blue and white WAVES uniforms) can be long or be short sleeved, with a yoke if possible, and free of any kind of trim or embellishments. The most important thing for the blouses is the collar shape. It should be pointed and the blouse must button at the neck to allow it to be worn with the tie.

Early war ties for the WAVES are two pieces and button at the sides of the neck under the collar. You can add these buttons to a new blouse in a flash. Another thing to keep in mind if you are on a tight budget is that your reproduction white blouse and shoes can double for civilian wear! Score!
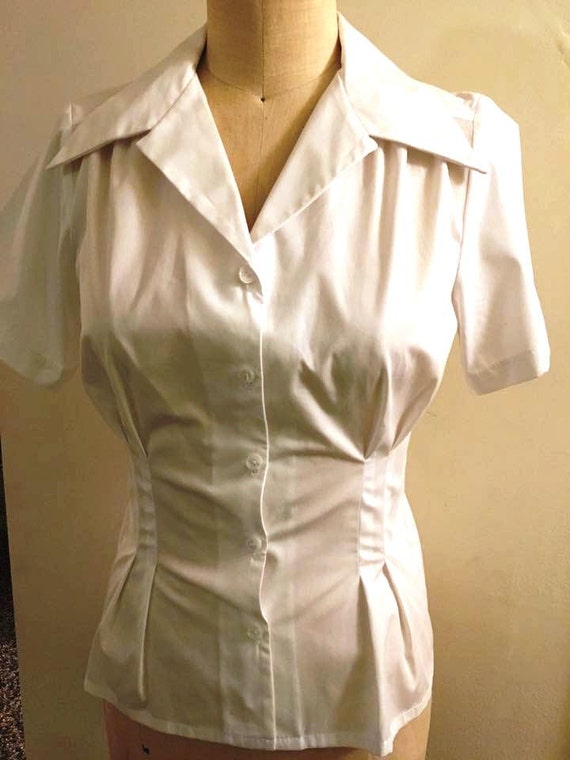
Blouse from Nudeedudee on Etsy

Notes on Sewing Your Own Uniforms

There are no patterns on the market for WAVES uniforms, though a highly skilled seamstress can draft patterns from originals.

As these are military uniforms, the materials used and construction details are very specific! Finding the correct materials for the blue wool uniforms and the cotton seersucker uniforms will be challenging but not completely impossible. I highly recommend examining originals (or high res photos) to gather information about the cut/fit and fabrics used. Invest in an original hat (overseas/garrison or soft crown with the WAVES tally), patches for the collar and buttons to complete the look if you are sewing your own inform. These will help immensely with giving an authentic look and feel. You can also take these items with you to fabric stores to help guide your search for fabric. Both the overseas/garrison caps in wool and seersucker, as well as the seersucker rating patches are the same materials as the rest of the uniforms. The blue rating patches for the most part are the same too.

Ordering fabrics online for any sewing project can be frustrating, so I highly recommend ordering fabric swatches first to match the correct color and weave.

----------

I hope this mini introduction into WAVES uniforms is helpful! Our next WAVES post will cover research materials. Future posts will also go into more detail about uniforms, how they are worn and what to look for when shopping for originals!

Have a research question about the WAVES? Ask away! 


Sunday, June 16, 2019

Sold But Not Forgotten - Du Barry 2413B

I haven't blogged in some time, so today I'm writing up a quick post on a past sewing project to help get back into the swing of things.

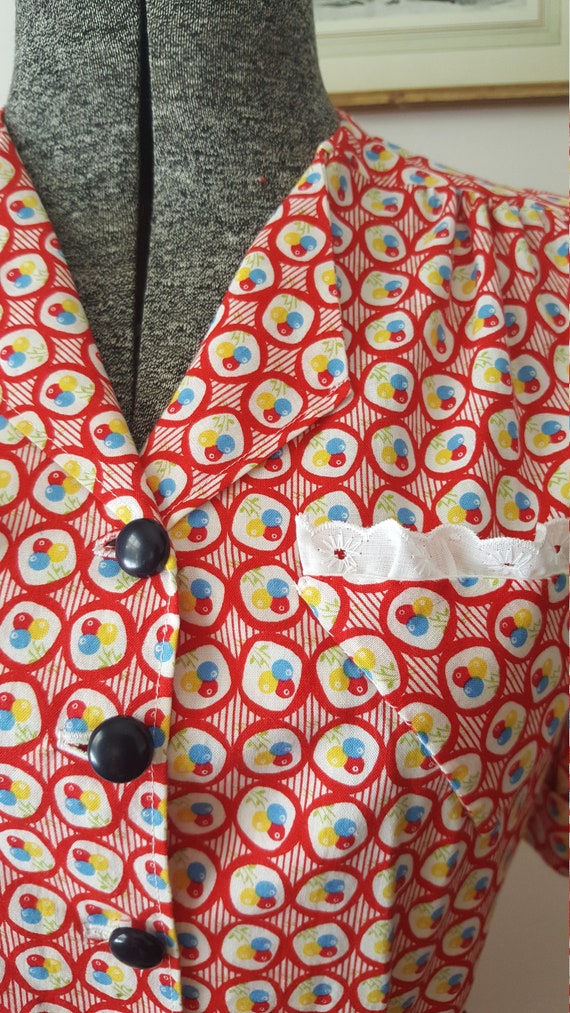
This dress is easily one of my top ten favorites of all the reproduction pieces I've made to sell so far. This super cute 1930s/40s reproduction cotton print was a lucky find at my local fabric shop. (I was also able to find it in a purple colorway as well!) A few of you may remember the first time I used Du Barry 2413B, waaaaay back when I first started sewing 30s/40s clothing for myself. It's a great pattern and one I can see myself sewing a few more times!

It's a fairly basic pattern but it has some great details too. I love the option of the little V-shaped pockets! They make the perfect accent for a war-era dress. While the skirt does have some tiny pin tucks, they are kind of lost in this particular print. I think in a solid fabric they would stand out a bit more.

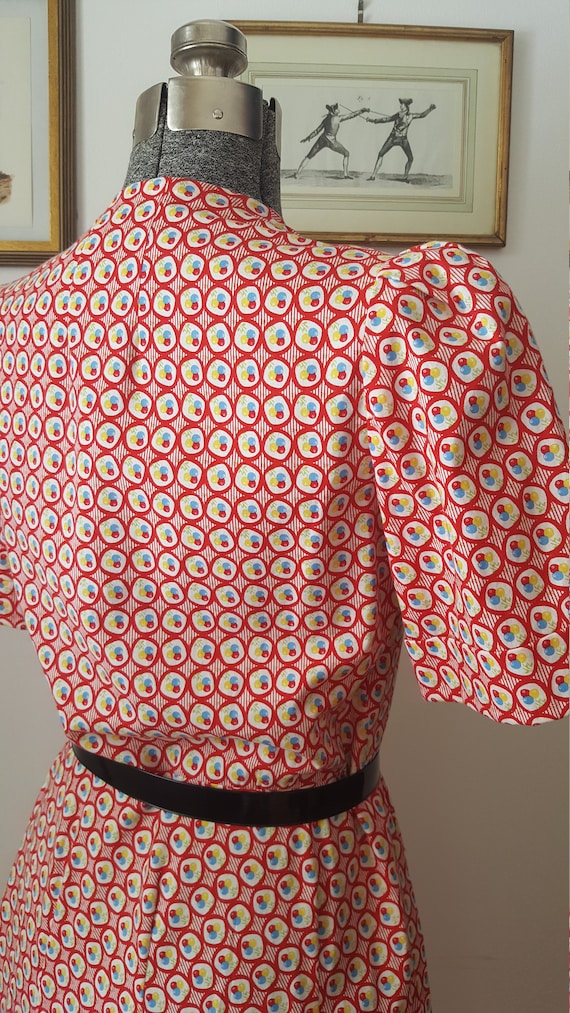
Here are a few in progress shots on the dress. Another thing I like about this dress are the little pouf sleeves and gathering at the shoulders.


Playing with some trim for the pockets! I ended up using this cotton eyelet. It helped break up the bright red print just bit. I added some dark colored vintage buttons from the stash too for the same reason.


Here are a few photos of the finished dress. I'm very happy with how this one turned out.


My friend Christiana bought the dress and she looks amazing in it! She even wore it for a photo session with A Timeless Collection. Here are a few images from that shoot, shown with permission.

Photo by A Timeless Collection

Photo by A Timeless Collection

Interested in purchasing a reproduction dress or blouse from me? Have a look at my Etsy shop.

Summary of the Pattern
Fabric: Late 1930s/early 1940s reproduction cotton print
Pattern: Du Barry 2413B
Year: About 1938/39
Notions: Buttons, thread, cotton lace trim
Time to Complete: Start to finish, I'd say about a week. It's an easy pattern to complete in a weekend if you have the time to sit and sew.
How historically accurate is it? Pretty darn close! The pattern is original vintage and the fabric is a historically accurate print. The buttons and lace trim, though vintage, are likely 1950s or 1960s.
Any tricky parts to the pattern? I've made this pattern once before and it goes together pretty easily.
Did you change anything? I chose not to add a side zipper. Instead of adding a collar I just turned but the front edges to form mini lapels.

Friday, April 26, 2019

Blog Update!

Hi folks!! It's been a looooong time since my last blog post! Just wanted to post a quick update to let you know I have not forgotten or abandoned this site. I have lots of things I want to blog about but finding the time over the last year has been a challenge.

I'm still sewing, still trying to sell my reproduction clothing, and working on a couple different research projects to get ready for some exciting events this summer. I also plan to do a little house cleaning on this site and change things up just a bit.

For regular updates on my sewing and research projects be sure to follow me on Facebook and Instagram. That's all for now!!


Sunday, May 20, 2018

1770s Fashionable Gown - In Progress, Part 1

As I mentioned briefly in my last post, I have jumped head first back into historical sewing. The fabric, pattern and bodice mock up had been sitting in the stash for over a year now. So when my friend planned a sewing weekend with some of our reenacting friends early this spring, I figured it was a good excuse to pull out the project and get back to work.

I'm using the 1770s Fashionable Gown pattern from Sign of the Golden Scissors. This pattern is fantastic and has needed only very slight alterations to make it fit. While some may raise an eyebrow at the price of this pattern, keep in mind you are getting A LOT for your money. All Smith and Larkin historical sewing patterns are essentially one of their two day sewing workshops in an envelope. It's not just the paper pattern for the gown and bum roll, but historically accurate sewing instructions, notes on fitting, fabric choices, stitches, etc. as well as historical information on the particular garment you are going to recreate. Included is a colorful documentation card that you can carry with you if you choose. The instruction booklet for the 1770s gown is 35 pages with color photographs to help you with each step When making an item of historical clothing, it's important to make a mock up. Especially if you have never used the pattern before. I've made a few 18th century gowns before so I'm pretty familiar with the steps involved. However, the fit of this particular gown is very different from my other gowns. First off, it's important to note that this style of gown is high fashion for the mid 1770s. The neckline and placement of the shoulder straps reflect that, as well as the looping of the gown skirts. This gown would not be appropriate for my normal middling class or British camp follower impressions. I'm not making this for any particular event, but rather more of a "just because I can" kind of project. And yes, it's going to be entirely hand sewn for the same reason.

Fabric choice is super important, I went with a lovely striped silk taffeta that is similar to what I've seen in period portraits and original gowns.


I used some miscellaneous fabric in my stash for the mock up. There are two sizes in each envelope so I cut the 34 bust as it seemed closest to my size when wearing my stays. The only adjustments I found were needed were to shorten the shoulder straps a bit and to lower the arm holes just a touch. After that I moved on to cutting out my lining and silk bodice.

During my friend's sewing weekend I completed my bum roll, assembled the linen lining, minus sleeves and shoulder straps, and cut out all the pieces for the silk bodice. I even finished sewing the pleats into the gown back pieces.


The side seams of both the linen lining and the silk are constructed with lapped seams. The sleeves use the same period technique but require an extra step to whip the lining into place. For those that have the new American Duchess kind to 18th century sewing the lapped seam in shown on pages, __.

Here is what the sleeves look like prior to stitching. I posted a live video on my Facebook page talking about this if you would like more details.


I spent one evening cutting out the panels for my gown skirts. Originally, I thought would skip the step of cutting my silk into period correct widths and save a little sewing time. The gown skirts are made up of two front panels, two sides, and one center back panel.

As it turned out, given the actual width of my silk and not wanting to waste any, it was actually easier to follow the instructions and cut multiple widths and then tapper the lower edge of each panel as needed. (Because bum roll!!) The instructions called for each panel to be 23 inches wide, as that matched the width of the original gown the pattern was based on. My silk was 50 inches wide so my panels are actually 25 inches wide. I will be able to incorporate the selvedge edge of the fabric into the gown fronts which will be nice. And of course I had kitty "help" because no sewing project would be complete without it!

With help from my husband, I tired the linen lining on to test the fit again. Then had him help me pin the silk on top, again to test the fit. Something just seemed wonky with the fit but was excited to see the gown taking shape. I suspected the fit issues had to do with the waist placement so I consulted the fitting section of the American Duchess 18th Century Dressmaking Guide. Turns out I was correct so I will need to bring the lower edge of the waist up just a bit before adding the skirts to get rid of the bodice wrinkles. Once I attach the skirts the weight of the silk will help smooth things out as well.

So, my next steps with this gown will be to pleat the skirts (SOOOOOOOO MUCH PLEATS!) Make my adjustments to the bodice and reattach the linen shoulder straps so the skirts can be attached. Then assemble the bodice lining and fashion fabric. Once that's done I can set the sleeves (again with help from the husband) and add the silk shoulder straps. The only thing left from there will be hemming and trimming! 

FITTING NOTES!!
  • This pattern was created as a one for one copy of an original in a private collection. The bodice fronts were pieced on the original gown so a pattern piece is included for the "bodice front extension." Instructions for the gown trim are also based off the original.
  • This gown is designed to wear over period correct undergarments i.e. shift, 1770s/80s stays, bum roll and, if you wear one, an under petticoat. Pick you pattern size based on your measurements while wearing proper undergarments.
  • This style also requires a bum roll to help give the gown it's "fashionable" shape. The pattern and instructions for the bum roll are included.
  • The shoulders may feel very restricting at first. I found when I first tried the mock up on that I had to rotate the whole bodice further back then I thought. Then the neckline, which is lower and wider than my 1750s/60s gowns, sat where it needed to which should be just above the top of the stays. 
  • The arm holes are meant to be high and snug and the sleeves should fit closely as well. You will want to make sure your shift is a mid to late 18th century style with close fitting sleeves to eliminate bulk.
  • The lower back section of the bodice is not meant to sit flat against the back, it needs to have some "space" if you will, to fit over the bum roll.

WAVES

WAC and WAVE uniforms in ad by Fashion Frocks, 1940s.  by annamouse, via Flickr


photos

WAVES:  Women Accepted for Volunteer Emergency Service

Women 20 to 36, Earn a Navy Rating.  US.  Navy.  Waves.  c. 1943.
Source
Related Posts Plugin for WordPress, Blogger...