Alright ladies and gents! The moment you have been waiting for! The winner of my vintage
2015 Fall Photo Contest is ........
But first! Let me says this was sooooo HARD! For my
spring photo contest, I had 10 people enter (
see the results here and view all the
spring entries here) and this time around 30 people entered!! Oh my goodness, I never expected this contest to become so popular! You can view all the contestant's gorgeous photos and their outfit descriptions in the
2015 Fall Photo Contest Album. I am so glad to have had Jessica of
Chronically Vintage and Lauren of
Wearing History help me judge this contest, and donate some truly awesome prizes, because wow! WOW ladies! Each and every entry truly stands out! As Jessica said,
"So many people brought their vintage styling A game to the table with
this contest" and we were all consistently impressed as well as inspired by you wore! The colors, the attention to detail, stunning backgrounds,
everything! Some of you even incorporated props which was really a nice touch! Many of you mentioned not having specific colors or articles of clothing as described in the
articles, and yet each out you put together great outfits! You should all be proud of your beautiful creations. I definitely want to hold another photo contest next year. Yes, oh yes!!
~ Maybe make it an annual event? ~
~ Should I keep it seasonal, summer and winter contests? (since we did spring and fall this year) ~
~ Or just do one contest next year with categories for day wear and/or evening wear? I can't decide! ~
~ What do you think? ~
Putting these photo contests together has most definitely been a blogging highlight for me this year. I hope you have all enjoyed them too. For me, reading these historical newspaper articles forced me to think outside the "vintage box" when planning an outfit and to look at my vintage wardrobe in a new and different light! I would never have thought to combine certain colors or items of clothing together. Lime green with navy blue for spring, why not?! Pink and orange for fall? That works too! It's been a fun challenge and one I have greatly enjoyed. These photo contests have also been a great way for me to meet and interact with new people who enjoy this crazy vintage loving hobby as much as I do. :) Thank you one and all!
And now, without any further ado ......
Because there were so many great entries, Jessica, Lauren and I decided to name a few Honorable Mentions in addition to our winner and runner up. I will start with those, in no particular order ...
Honorable Mentions
Debbie Wagner! (Debbie often appears on her daughter Esther's blog,
Dolly Creates.)
“… plaid
topcoat in tones of rust and brown. Its soft luxurious collar…”
Using the newspaper
article as inspiration, I chose to wear a wool dress “in tones of rust and
brown.” Accenting my outfit are a mink collar and hat, along with powder blue
pumps, which bring out the subtle blue tones in the plaid. A hand beaded purse
and gold necklace add the finishing touches to this refined casual fall
ensemble.
Sabrina W. of
Vibrant Vintage! (You can see more of Sabrina's outfit
here.)
I was immediately inspired by a vintage 1940s tweed suit I had recently
found, and knew it would be the perfect thing to build an Autumn
ensemble around. I paired the suit with a black fur collar, a brown
fedora, and t-strap heels. I particular liked this passage in one of
the articles: Brown
appeared again and again in both accessories, suits and coats. One
noteworthy ensemble included an imported tweed suit in a soft cinnamon
brown shade worn with dark brown accessories and a nutria fur coat… This was worn, too, with dark
brown accessories, and the brown felt hat had a sweeping profile brim. I
felt something sporty, such as the fedora, paired with ladylike fur
would be a wonderful combo. Black and brown can be a striking combo, I
believe, and I also paired it with a jewel-toned red blouse and pearls.
Frances of
Polka Polish!
Change Basic Black Effect
The possibility of changing the
looks of a basic black dress with a variety of accessories began with an
all-black ensemble as to shoes, off-the-face hat, bag and gloves, but
with a heavy necklace of Balenciaga's honey pearls.
I had a 1940s black dress to start with, and simply chose my largest black hat to compliment. Dress, hat, and gloves are all vintage, paired with a pair of modern shoes with a bit of '40s flair. For the "honey pearls" I chose a strand of large carved Bakelite beads, with similarly carved earrings to match. As a final touch, a large plastic maple leaf (80s Avon, but does a good Bakelite impression) helps keep everything a little more autumn.
Maranda Borgerding
!
"Suit: was made by myself, using a few late 1930's patterns as well as a copy of Make and Mend (1942) I wanted to keep it as close to the ration era as I could. It is made from a mid weight stone gray wool with very faint blue stripes running through it.
Hat: was gifted to my by the daughter of the lady that originally purchased it in the late 40's (she said)
Shoes: basic black oxfords with a stacked wooden heel
Purse: gifted to me with the hat.
Corsage: I purchased it at a antique shop a bit ago, and it is what would have been sold at bond rallies.
Earrings & collar pin: They were passed down to me from my husbands aunt, who was gifted them from her husbands grandmother.
Star pin: The owner of the antique shop gifted it to me since I am a military wife and I love old jewelry, she thought it may be something I would like.
I'm not sure what more I could say, but think you for allowing me to be a part of this wonderful group! I am extremely new to this era but I am loving every single second of learning more and more."

The Runner Up
The prize for the runner up goes to Jennelle Gilreath!! Congratulations!
"I chose my outfit to reflect my personality and love of colors I like to mix and match together. I felt wearing trousers would be a nice spin on the look and I had them in a lovely chocolate shade that is very fitting for Fall. I noticed the article quoting shades of brown appearing "again and again" as staple pieces or in accessories, so I felt it would add to my ensemble to go with this shade.
I love green, and any chance I get to wear green, I take advantage of it, especially it being next to my hair. My blouse is original vintage from a skirt and shirt set, and my snood was created from an early 1940s pattern. I wanted to do a spin on something different with my hair instead of a hat, but keep true to the era so my inspiration for the quote "green took a brighter curtain call" drew me to use one of my favorites colors, especially when it was compared to being paired with shades of brown. I wanted to finish off my ensemble with my favorite vintage wool blazer. Photos of the models in houndstooth and plaid suits and jackets, were the cause for my pairing of my jacket."


The Winner
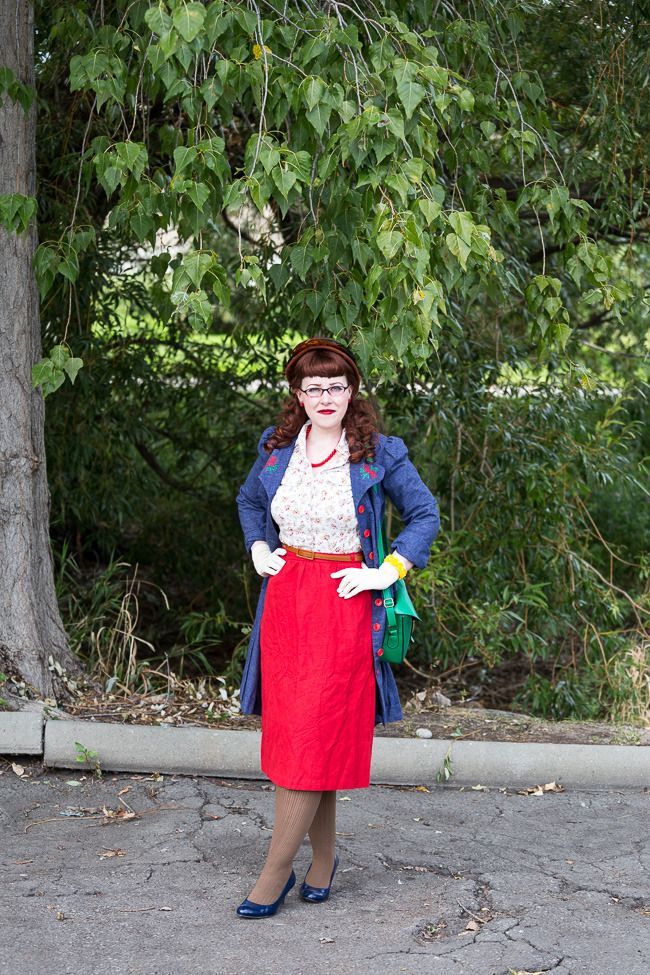
And the grand prize goes to
Kristen Stoltzfus of Verity Vintage Studio!! Congratulations! (You can see more of Kristen's
outfit here.)
"…Red kid gloves provided a startling accent for a soldier blue jacket
suit, otherwise ensembled with brown accessories was the line from the
article that inspired me to use my deliciously detailed vintage 1940s
“soldier blue” jacket and the plaid suit skirt I made to coordinate. Red
cotton gloves replaced the kid ones, tying in the lipstick, patriotic
brooch, and red lines on the skirt, and I accessorized with a
simple-but-stylish 1940s chocolate brown purse, hat, and heels for a
colorful and tailored wartime ensemble."
Congratulations
Kristen and
Jennelle! (I will be in contact with you both shortly about your prizes!)
THANK YOU to everyone who submitted photos, you all looked amazing! I wish I could send a prize to everyone! Also another huge THANK YOU to Jessica and Lauren for their help and donation of prizes!! It was a pleasure (as well as great fun!) collaborating with the two of you and hope to do so again in the future!
I would love to hear your feedback on my spring and fall photo contests and suggestions for any future contests! Are you interested
in guest blogging, sponsored posts, giveaways, link swapping, pattern swapping or other
collaboration ideas? Feel free to contact me about that too!